I’ve been a bit remiss on contributing to the Fresh from the Oven challenges of late, I missed out on doing croissants and pizza, both things I really fancied trying. Well i did do the pizza but I forgot to blog in in time, oops!
So this month I got well ahead of myself and made the challenge almost week for the deadline instead of on the day!
The bread we baked was Turkish Pide and the challenge was hosted by Mrs Ergul.
I had a bit of fun with the US measurements getting muddled and almost using a whole stick of butter instead of half. But I got there in the end. The bread was really easy to make and very tasty. Mrs Ergul says the dough might be very wet but mine actually started off quite dry so I had to add more water to get it fairly sticky. I used my usual kneading technique of short gentle kneads spaced out through the rising.
To go with the bread I made some Turkish inspired kebabs (minced beef, chilli, cumin and coriander), some minty yoghurt and some tomato and onion salad. It was very yummy and I think they bread’s soft texture would be great with burgers. We used up the rest of the bread with dips the next day.
Here’s the method as given to us my Mrs Ergul (with some UK annotations by me):
Ingredients:
4 cups (to 5 cups) All Purpose Flour (ie plain flour, I only needed 4 cups and I used a cup measure as I have a set. 1 cup is approx 130g of flour)
1 and 3/4 cups Warm Water (1 cup = 236ml)
1/2 stick Butter ( melted ) (1 stick = 113g)
1/2 tablespoon Instant Yeast
1 tablespoon Sugar
1/2 tablespoon Salt
Topping:
Black and White Sesame Seeds (I used cumin seeds as I didn’t have sesame seeds)
In a large mixing bowl, mix all of the dry ingredients
Add melted Butter and Warm Water into this mixture and knead
The dough should be sticky
Cover the bowl with a plastic wrap and keep it in a warm place for rising
Let the dough rise to double its size
Knead the dough again until it is bubble free
Place a parchment paper on a 13″ by 10.5″ baking tray
Take the dough to the tray and make it flat with your hands until it cover all of the surface of the tray
Dampen your hands with Water if the dough stick to your hands on this step
Then take a knife and give the dough square shapes going deep down
Sprinkle some Sesame Seeds on top
Preheat the oven to 350F (R4/180C)
Let rise the dough for half an hour
Bake it for 30 minutes or until the color of pide turns light brown
Take the pide out of the oven and let it cool for 20 minutes and cover it with a clean kitchen towel to keep it soft
Mention cheese and onion and most people think of crisps. My quick Twitter survey revealed answers naming the Walkers brand, the colour of their bags (blue apparently) and even Gary Linekar, the face of Walkers crisps for so long he must surely have earned more from promoting crisps than from playing football and being a pundit. A few people were more inventive suggesting pasties and toasties but for most it was all about the crisps. The reason the crisp flavour works well is that the milky sour tang of cheese and the pungency of alliums are happy bedfellows, which means they have lots to offer in the kitchen, and spring is when plenty of both are at their best, real cheeses and real alliums, not Walkers crisps.
Thinking about the combination a whole host of dishes come to mind: leek and cheese sauce for pasta or chicken, onion soup with a lovely melting cheese crouton, cheese with pickled onions, cheese and onion marmalade sandwich, fresh goats cheese with chives, Yarg cheese wrapped in wild garlic, omelettes, frittatas or flans in a variety of allium and cheese combinations. The possibilities are endless.
British grown alliums are at their best now, lovely slim tender delicate leeks, new season spring onions, regular onions, shallots and of course wild garlic. Wild garlic has become an ‘on trend’ ingredient in the last couple of years as foraging has grown in popularity. It’s easy to find (the smell is a giveaway) particularly in woods by streams, you can grow it in your garden in a shady spot (but beware of it taking over) and you might see it at farmers’ markets or farm shops. You can eat the leaves and the flowers but like any allium it can range from mild to blow your head off in strength so always taste a little first before deciding how to use it. If you go foraging make sure you aren’t on private land or ask permission first, don’t collect from close to busy roads and be sure you know what it is you’ve picked. Don’t dig it up, leave enough for others to have some and for the plant to survive next year. The flowers are pretty sprinkled on salads and the leaves make a good substitute for leeks or spring onions.
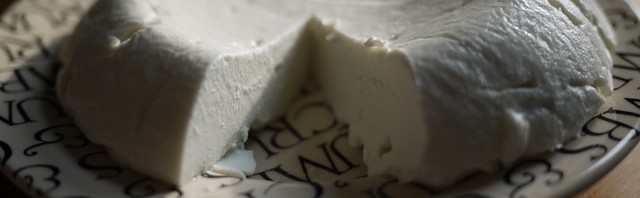
As for cheese, fresh cheeses are particularly tasty in the spring as herds start to feed on grass again enriching the milk with clean herby flavours. Britain has a wealth of artisan cheeses and you should be able to find at least at one or two fresh cheeses in delis and farm shops. If you can’t then why not do a little experimenting in the kitchen and try making your own curd style cheese. It’s very simple to do and works with all types of fresh milk: cow’s, goat, sheep, even buffalo. Unpasteurised milk is lovely but normal works fine. This method is quick and easy and good as a supervised experiment for children. The yield varies depending on the milk, its highest with buffalo and lower with cow’s milk but whatever you choose you’ll get a lovely fresh delicious cheese. You can use the leftover whey in bread making in place of some of the milk or water.
Fresh cheese
Adapted from a recipe in the Casa Moro Cookbook by Sam & Sam Clark.
Ingredients:
750ml milk
1 tbsp essence of rennet (note that essence of rennet has already been diluted if you use undiluted rennet you must dilute it with water first)
Method:
Warm the milk to between 32-37C.
Add rennet and stir.
Pour into a bowl and cover with cling film.
Leave in a warm place for 30-45 minutes.
The curds will have set so cut them into about 3cm cubes whilst still in the bowl. Be gentle.
Leave for a further hour in a warm place.
Strain the curds into a muslin-lined colander.
Leave for about 6 hours for the whey to drain.
It’s as simple as that. The cheese will keep for up to a week in the fridge. It’s very mild in flavour and is particularly good rolled in some finely chopped wild garlic leaves or other fresh herbs. It also works well in omelettes, flans, and frittatas and stirred into pasta, with alliums of course and maybe a little mustard.
So next time you think of cheese and onion go beyond the immediate thought of a crisp flavour and branch out a bit in the kitchen.
Its been a while since I’ve taken part in any of the Fresh from the Oven challenges; either I had the time but the recipe didn’t appeal (usually because it was sweet, I don’t really do sweet baking) or the recipe looked great and I was mad busy. When I first looked at this challenge from Jo’s Kitchen my heart sank to my boots, yet another sweet recipe I thought and rolled my eyes. Then I spotted tucked at the bottom that instead of sugary raisiny chocolately sweetness there was an option with cheese. Yes CHEESE one of my ALL TIME favourite foodstuffs.
The finished article
I still left making it to the last day though, now there’s a surprise! So this morning I was dashing about making sure I had the right ingredients. Naturally my instinct to not follow ANY recipe to the letter immediately sprang into action and instead of getting some cheddar at the shops (which they had) I was drawn in by some hard goats cheese from Lancashire and bought that instead. This may have something to do with the fact that cheddar, even really good cheddar, is not really that high up my list of favourites but Lancashire most definitely is.
So off I set to make the recipe. The original recipe does not give full instructions for the savoury version so this is my adaptation (note I did half of these quantities). You can see the original recipe here.
Savoury Kringel
Ingredients (Makes 1 large loaf)
Dough
40g fresh yeast (I used 1 sachet fast action yeast for ½ the flour)
1tbsp sugar
250ml milk, lukewarm (I had to add about another 10ml to my 125ml as the dough was too dry)
2 egg yolks
50g butter, melted
600-700g flour (I used 300g of strong white bread flour)
I didn’t add any salt as I know my cheese was very salty.
Filling and topping: 4oz grated hard strong cheese such as cheddar
Method
Mix the yeast and sugar in a bowl. Add the lukewarm milk and egg yolks, then mix in the flour and melted butter and knead well. Shape the dough into a ball, cover the bowl with a tea towel and leave to rise in a warm place for 30 minutes. (I did three fast Dan Lepard style kneads over a 1 hour rise)
Preheat oven to 200°C/Gas 6. Dust your work surface with flour (I used oil I never use flour). Take the dough out of the bowl, knock it back and roll out to a thickness of 1cm (mine was prob less than 1cm). Sprinkle about 2/3 of the grated cheese over the rolled out dough.
Roll up the dough like a swiss roll and cut it in half with a sharp knife (lengthways). Starting from the uncut end, plait the dough, lifting each half over the other in turn. Finally, shape the plaited bread into a B shape (mine was circular as I only had half the quantity) and transfer to a greased baking tray. Bake for about 25 minutes or until golden.
Once cooked turn off the oven, sprinkle the bread with the rest of the cheese and put it back in the cooling oven for 5-10 mins until the cheese melts. Allow to cool fully and serve.
Ready to eat
Was it good, yes. Will I make it again, I might. I think it would be good with soup (we had a chunk with salad). It looks rather attractive and it is easy to make so it would be a good loaf to make if you have guests. I’m not 100% sure I like savoury filling that much with an egg enriched dough as I find the taste and texture a little too cakey with the savouriness, but that’s just me.
I know I’ve been gone a while but hey now I’m back! First post after 5 weeks is this Fresh From the Oven Challenge that I hosted. I am going to do a post about going AWOL so watch out for that coming up in the next few days, but here to whet you appetite for upcoming posts is some delicious bread I can highly recommend.
Here's one I made earlier
Although I’ve made this loaf a lot of the past few months either white or a 50:50 white-wholemeal mix I still thought I’d do one especially for the challenge. Unfortunately the day I was baking it I was in the the final stages of web project and wasn’t really concentrating properly. It was also quite a cool day so the 2nd rise seemed to be taking for ever so I put it in the oven regardless (it was no where near the top of the tin!) . I got okay oven spring but in the first 10 minutes of cooking I lost track of time as the client called to sign off the website ready for go live and to say how pleased they were. Result a rather dense chewy loaf, with a very crusty crust and a borderline burnt top. Still tasted better than anything you get in most bakers….
Less than perfect but still very tasty
Here’s what I said to the Fresh from the Oven group when I set the challenge:
I’ve done lots of um-ing and ah-ing about what to pick for the challenge, I wanted something where I could show you the kneading technique I learnt from the Dan Lepard course I went on, something that seemed specifically English and something not so time consuming that you all decided not to participate. Crumpets and pikelets were out on the basis they don’t require kneading, sourdough on the basis that you might not all have starter so that would be a week of building one. Stotties were almost in but the recipe I found had potato in and that’s not how I remember them. Staffordshire oatcakes popped up but they don’t have to be kneaded either and so on and so forth.
At last I decided to keep it simple but still English. There is lots of talk of how bad English bread is (and it is when its made on an industrial scale using the Chorleywood process) but then everyone decides to ignore all thought of English bread and fall into the arms of French and Italian and other baking heritages. I love all these other breads but I also love a good old fashioned properly made tin loaf that is soft but slightly chewy, has a nice medium crust, that toasts brilliantly and makes a mean sandwich. The secret of course is in using milk for part of the liquid this gives a softness that’s just right without making the loaf a full on slightly sweet milk loaf (although when I found this on the Lakeland site I did nearly decide to do milk loaf).
If you don’t fancy doing a tin loaf then perhaps you can take part by using the kneading technique for your favourite loaf because it seems to work for everything from sourdough to rolls to pizza base and more.
First the technique:
Dan Lepard says he developed this when he was working full time in commercial kitchens (that made artisan hand kneaded bread) because there wasn’t time for full 10 minute knead of all the different bread batches so he switched to short kneads spaced out and found it works just as well, part of the development of a good gluten structure is dependent on the time elapsed not the vigorous kneading. I liked the idea because I’d not been getting good textures with either a machine or a normal hand knead. I am now a wholesale convert.
Note:
You must use oil not flour on the kneading surface and your hands. Something like vegetable oil is good.
The dough must be quite sticky and soft to start with. It will firm up when kneaded and as time progresses.
Steps:
Once you have soft sticky dough leave it covered in the bowl for 10 minutes.
Now oil your kneading surface and hands and tip the dough out.
Knead for about 12 seconds by folding in the edges to the centre, a bit like shaping a round loaf, rotate the dough as you go.
Flip the dough over, leave it on the surface and cover with a cloth. Wash out the bowl and then oil it lightly. Put the dough back in the bowl and cover.
Leave for 10-15 minutes and then do another 12 second knead. You will notice the dough is already less sticky and firmer.
Leave for 20 -30 mins and repeat the fast knead. You are aiming to have kneaded the dough 3 times in the first hour.
Leave covered to rise until at least 50% larger but not more than double in size (kneading once per hour if it takes more than hour to increase in size).
Tip out onto the oil surface and press the air out of the dough using the tips of your fingers so its square-ish in shape. Repeat the fast knead process (or fold in to thirds then rotate through 90, flatten again and fold into 3rds again).
Shape the dough as required for the particular loaf you are making. Put it in a tin, or supported in a floured cloth in a bowl.
Leave to rise until at least 50% larger and preferably almost double in size.
Slash top and bake as per your recipe.
White Tin Loaf (based on Dan Lepard’s Quick White Loaf, p63 of the Handmade Loaf)
2lb loaf tin greased and floured or lined with baking parchment (no need to line the short ends just oil them).
Oven to be pre-heated to its maximum setting (R10/250C) and with a tray of water in the bottom to create steam.
Ingredients:
200g semi skimmed milk at room temp (Dan uses whole milk but semi skimmed seems to work fine)
150g water at room temp (remember 1g = 1ml but its easier to be accurate weighing fluids)
Mix the water and milk together in a separate bowl and whisk in the yeast.
Add the liquid to the flour and mix with the fingers of one hand to a soft sticky rough dough. You may need to add a little more liquid do this a teaspoon at a time until you have a soft sticky dough.
Follow the kneading instructions above.
The first rise will probably take about an hour from the last knead.
To shape for a tin loaf, flatten the dough to a square about the same width as your tin. Roll the dough into a cylinder and press the seam firmly, fold under the two short ends and place in the tin seam side down.
Allow to rise (covered) to 1 ½ to 2 times volume i.e. to the top of the tin.
Slash the top of the loaf along it length and put it straight into the oven for 10 minutes at maximum temperature. After 10 minutes check how it’s browning and drop the temperature as follows (these baking guidelines are from the River Cottage Bread Book):
R6/200C if the crust is pale
R4/180C if crust is noticeably browning
R3/170C if crust is browning quickly
And cook for a further 40-50 minutes.
I usually check again part way through this time and either adjust temperature again or cover the top with foil if it’s brown enough. Also note that with a traditional gas oven (i.e. one without a fan) the top may brown far too quickly on the side near the heat at the initial temperature so you might want to start at a lower setting of R8/9 for the first 10 minutes. Adapt the setting for what you know about your oven and how things usually bake.
When it’s cooked turn it out of the tin and allow to cool.
Then when it’s cooled cut a big huge doorstop of a slice, toast it and slather with lashing of butter. Yum.
The recipe also works well with a mix of 50:50 wholemeal and white bread flours. You’ll probably need 2-3 tbps extra water.
Last month I schlepped in right at the last minute with my Fresh from the oven challenge, this month I did better – hey I was there a whole week before the deadline baking away. How organised and complaint of me. Erm, well, maybe. Those who know me well know that doing what I’m told when I’m told is something I have mastered the art of mostly avoiding. So this month instead of taking the deadline to the wire I thought I’d ignore some of the very specific instructions and freeform the recipe a bit even though it wasn’t something I’d ever tried before. Did this lead me on a route to disaster – lets see……
I was pleased when I saw that Ria (of Ria’s Collections) had picked what she calls stuffed buns, because I quick glance though the recipe suggested that these were going to be like the legendary curry buns I ate at a hill station in Malaysia with my husband on our very first holiday together. Wow. We have often reminisced about these little buns, which were wonderfully soft and had a lovely curry filling. We’d never tasted anything like them before and since I’m talking quite a few years back when only the (un)lucky few had email and the internetsuperhighwaythingy was in its very early infancy we never tracked down a recipe. They became a kind of mythical dish. Could Ria’s recipe live up to all this?? We both had very high hopes.
Curry buns right out of the oven
The recipe basically seems to be one for a kind of brioche type dough made with milk, a fair bit of sugar and also egg. Ria is very clear that it MUST be kneaded for 10 minutes to achieve the right consistency. The filling is a mild chicken curry, Ria suggests paneer can be used for vegetarians. And this is when I start to freeform. I happen to have some lamb curry leftover so I decided I’m going to use that as a filling – can’t go far wrong surely. The dough just sounds too rich – I quite like brioche but since this is a joint memory we are trying to live up to here and Ian doesn’t like sweet dough’s I cut back on the sugar a bit and swap the egg for the same volume of milk. Then I just go for it and ignore the 10 minute knead instruction as well. I blame Dan Lepard for this entirely. He doesn’t do a long knead and since learning his method in mid June I’ve become a bit of a convert…you make a rough dough, leave it for about 10 minutes, come back, 10 seconds of folding, repeat this rest and knead 3 times in the first hour and then once per hour during the first rise. It’s worked well on every loaf so far I can’t see why it won’t work here. The theory is that it’s not so much the vigorous kneading but the elapsed time that creates a good network of bubbles.
The dough is quite soft and a little sticky but not too difficult to work with as it has oil in it which makes it pliable. It rises quite quickly but it is a fairly warm day. After the first rise you divide it up and shape it into rounds put some curry mix in the middle and then shape rather like a round bread roll. It has a 20 minute rise like that and then it’s in the oven. You have to be careful because the richness of the dough means it browns very quickly – they are cooked in 10 minutes.
mmmm look at that delicious
So were they any good? Absolutely yes. They had a good soft texture and certainly lived up to our memory from Malaysia. Even with my changes the dough was still rather rich and sweet for our liking so when I try them again I’ll cut back on that further. It was a good way to use up some leftover curry and I don’t think they suffered from all my meddling – of course I might be wrong, the real deal might be even more delicious, but I’m more than happy to have found a way to recreate a happy food memory.
Thanks Ria for the recipe and I’m not sorry I meddled with it :0
Recipe for dough (I used the cup measures in Ria’s original):
1 tsp dry yeast (I used fast action yeast)
2 tbsp warm water
1/2 cup milk
salt to taste
1/2 cup oil (I used rapeseed)
2 cups all purpose flour (I used strong bread flour)
1/4 cup sugar (I sued about 1/3 cup and the dough was still too sweet I thought)
1 egg beaten (I used another couple of tablespoons of milk)
egg white and sesame seeds to decorate if you wish (I didn’t)
dissolve yeast in warm water with 1/2 tbsp of the sugar and 1/2 tbsp of flour. Leave for 10 minutes.
Boil the milk and allow to cool (gosh I didn’t do this either). Once cool add sugar oil and salt and mix until the sugar dissolves.
Add 1 cup of flour and mix to a smooth paste.
Add the egg and also the yeast mix then the rest of the flour and mix to form a soft dough.
Knead using your preferred technique.
Rest and when its doubled in volume shape into flat rounds, fill and shape into buns by folding the the sides of the rounds to the centre. Decorate with egg and seeds if you wish.
Leave to rise for 20 minutes covered with a cloth then bake at 200C for 10 minutes. I actually did them at R6/180C and they took 10 minutes. Be careful they brown very quickly.
This is my first ‘Fresh from the oven’ bread baking challenge. I missed out on the first two because, well because, I was just too slow off the mark signing up. Anyway I’ve joined up now and I’m hoping its going to a be a fun way to do some different breads and also chat with other food bloggers and improve my breadmaking.
As soon as I’d signed up and logged on I took a look at the challenge and thought ‘hmmmm interesting, not tried that before, best do some reading round the matter’. This is a technique I term displacement activity i.e. read up on things rather than getting on with doing them, instead why not mull them over, learn something new, contemplate different angles, ponder, maybe be buy a new and, of course, necessary piece of kit to aid the process.
Cooking on the griddle
And then….
I was sitting around on Wednesday thinking:
‘um must be time to do another loaf of bread what shall I try?’, and
‘hmmmm haven’t written a blog post for ages AND haven’t blogged any of my bread exploits’
Anyway very fortunately for me, Claire over at Purely Food, who set this months challenge, had picked English muffins and a quick squint at the recipe revealed that it didn’t require any exotic ingredients – in fact I had everything I needed right there in the cupboards. So I was sorted for a day of bread making yesterday. There’s nothing like taking a project to the deadline I always say…..
The recipe Claire had given us was from the River Cottage Handbook (#3 Bread) (see it here) but we are free to use other recipes or adapt as we see fit, all in the spirit of experimentation and sharing tips and techniques. I decided I’d stick pretty much with the recipe but halve the quantities as it said it made 9 muffins and that seemed rather too many for two people one of whom remains to be convinced that muffins are worth the fuss (lets hope these homemade ones are a hit). I also adapted the kneading technique to the one I learned from a 1 day Dan Lepard masterclass I attended back in June.
Here’s my thoughts on the recipe and how things went:
halving 325g makes it difficult to weigh out on lovely old-fashioned balance scales – I think I really do need electronic scales
I always weigh the water – weird but more accurate; remember from at school 1ml = 1g
I should have used 5g of yeast but the sachet was 7g so I put the lot in
I used extra virgin rapeseed oil instead of sunflower – because that’s what was to hand
the dough wasn’t as sticky as I expected initially so I added another splash more water – kind of undermines my accuracy of weighing the first bit as I don’t know how much a splash is
I used the Dan Lepard kneading technique – i.e. several short kneads spaced out
it was a warm-ish day so the dough seemed to rise quite fast, it only took about an hour to double in size
halving 9 gets 4.5 you can’t make 4.5 muffins I chose to make 4 instead
I cooked it on an oiled flat cast iron griddle
the muffins came out pretty giant
it’s hard to tell how brown or otherwise they should be on the outside as there’s only a picture of one split and toasted – I think mine are probably too brown
All that remains is to test them at breakfast in a bacon and egg McMuffin style. I shall report back.
UPDATE 30/08/2009:
The McMuffin style breakfast worked really well. We toasted the muffins lightly then buttered them, added 2 rashers of bacon (unsmoked), dolloped on some ketchup and topped with a fried egg (easy -overed) then popped the top of the muffin on and munched away. I was so busy eating I forgot to take a picture (ddoh). They tasted really good although we didn’t wrap them in greaseproof as Mathilde had suggested (see her McMuffin brunch post here),Ii might do that for extra fun if I had guests staying.
Overall I’ve been really pleased with the muffins and I’ll do them again, its nice to try something different. The texture came out nice and even and they stayed good for 3 days – don’t know if they would last longer if I’d made the bigger batch. Curiously the semolina flour on the outside makes them taste slightly salty even though they aren’t. They made a tasty change from soft rolls and they were scored 7/10.
The remaining two muffins have also been eaten at breakfast; yesterday with blackberry curd:
Last weekend the twitter wires were buzzing with foodies claiming to have found superbly ripe blackberries in and around London. Seemed a little early to me but people were twitpic-ing them and they looked good. I was still doubtful but thought I’d take a chance and see what I could find.
oops I spilt some!
We found loads and loads and loads and loads of bramble bushes and plenty of smallish under ripe blackberries. No big fat juicy ones as other claimed to have found. I was beginning to think perhaps they were all having me on and had been foraging at their local supermarket…..
I wasn’t prepared to give up – I had empty bags to fill so after a bit more searching we settled on a spot and started to pick the best we could find moving on bit by bit to take the ripest ones and leaves the others for another day. We eventually collected about 1.5lbs – not a lot but I think another week or so and there will be a much better haul. We only saw one other person collecting and the bushes didn’t look like someone else had got there first and baggged all the plumpest ones. We did see plenty of people soaking up the sun, having picnics and larking about on the boating lake but no one was interested in blackberries.
So then I needed to decide what to do with the fruits. I wasn’t sure they were sweetish but a bit small to make a dessert with and it was too warm for crumble. So I rinsed them let them dry off and popped them in the fridge whilst I spooled recipes round in my head. then at breakfast one day when I was enjoyed some of Ginger Gourmand’s Lemon Curd (bought from her UKFBA stall a couple of weeks back) it came to me:
BLACKBERRY CURD
Genius I thought – tart berries and sweet butteriness what a combination. So back to the recipe books to find a recipe – well could I find one, no I could not and I’ve got at least four books on making preserves……it was time to freeform a recipe. A bit of detailed reading and I decided I that adapting a recipe for gooseberry curd would probably work. Here’s what I did:
Goodshoeday’s Blackberry Curd – makes 4 small jars
700g tart blackberries – rinsed and picked over for bugs and leaves
80ml water
Put the blackberries in a pan and add the water, bring to a simmer and cook for 15 minutes until they form a puree. Rub through a sieve (preferably nylon) so you get as much of the juice and fruit as you can but no pips. Measure the volume of juicy pipless puree you now have. I got 350ml.
For each 200ml of puree you need 1 large egg or 2 yolks, 150g of sugar (caster) and 40g of unsalted butter (plus maybe more see later).
So I used 70g of butter, 2 medium eggs, and 260g of sugar as the nearest sensible equivalents.
Put the puree sugar and butter in a heatproof bowl and warm it over a pan of hot water, stirring until it melts/dissolves. Beat the eggs thoroughly and then add them to the blackberry mix, keep stirring over the hot water until it all thickens and coats the back of a spoon like a good cheese sauce would i.e. still a bit runny as it will thicken as it cools. Mine seemed a bit runny do I added about another 10/15g of butter (I didn’t weigh it I just added small pieces until I got the desired effect).
Then pout into hot stertilsed jars trying to avoid getting it all down the jars and on the work surface like I did (new narrower jam funnel needed for me I think). Lids on jars and leave to cool before storing in the fridge.
Remember to lick the spoon thoroughly and barter hard with anyone who tries to blag a jar because it tastes really good.
Recipe based on Gooseberry Curd by Marguerite Patten in The Basic Basics Jams, Preserves and Chutneys Handbook