Orange Voddy

Oranges seem to be on 3 for 2 special offer at the moment so I have quite a lot. They are super juicy and tasty. As I like orange liqueur I thought it might be good try an orange voddy.

I’ve just prepared it now and its in the pantry doing its fruit voddy thing.

Here are the steps:

You can find my rules of thumb for fruit vodka making here.

Super easy super tasty ice cream

Spurred on by various people posting inspiring midsummer treats (like Scandilicious talking about sweet sweet prawns here) I decided to have a sneaky bowl of some lovely ice cream I’d made last week for lunch (obviously I made lots just in case I needed a sneaky snack or two).

With sliced ripe nectarine and a sploosh of cream over it.

Its just about the easiest ice cream you can make no faffing with custards, no making of syrups. Just follow there basic instructions and you’ll have lovely ice cream too.

Ingredients:

equal volumes of double cream and greek yoghurt (total volume to be equal to about HALF the size of the bowl of your ice cream maker)

a handful of soft fruit e.g. strawberries, raspberries, blactcurrants (I used raspberries) squished with a fork

a splash of cordial or fruit vinegar to complement your choice of fruit (I used Womersley Vinegars Golden Raspberry with Apache Chilli)

Method:

Mix all the ingredients together in a bowl. Set the ice cream maker runnning. Pour in the mixture. Leave to churn. Its quite soft set when first made.

Eat, with fresh fruit and double cream poured over.

PS: Don’t have an ice cream maker well you can make it by the freezing in a box method but I’ve never tried. I suggest to get an ice cream maker on you must have gadget list

PPS for those who may be concerned I have switched to eating desserts I can confirm I had a rather good cheese and ham sandwich on homemade bread before I indulged in the ice cream

Gluts of all types

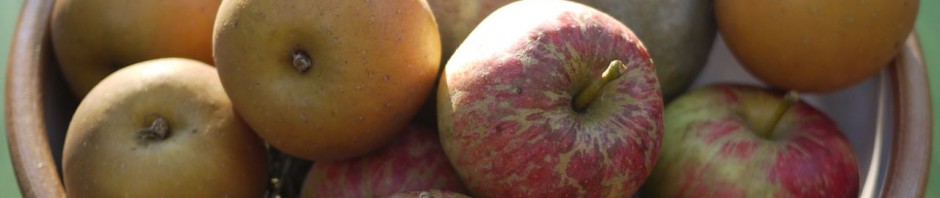
It’s coming to the end of harvest time but everywhere you look there are gluts of produce to be turned into something delicious. Some to be eaten now, some to be saved for the winter months. Gardens and hedgerows are filled with bounty and will continue to provide opportunities to harvest interesting things until late October. You might have your own fruit trees providing you with an abundance of apples, pears, plums or damsons, too many beans, courgettes or unripe tomatoes. Maybe a neighbour has a surfeit they need to share. There’s sure to be produce by peoples gates either for free or very cheap. And of course you can go foraging in country lanes, in parks and open spaces, on moorland.

Whatever you find there’s plenty of ways to put it to good use: cakes, crumbles, pies and tarts for now, freezing and multiple ways of preserving for later…..compots, jams, chutneys, pickles, curds, vinegars, favoured gins or vodkas, fruit jellies and cheeses, cordials, wines and ales, ketchups and sauces. Almost too may choices.

First of all some rules of foraging:

  1. Be sure you are allowed to forage from the lane/park/open space you choose; land maybe protected or private, foraging isn’t just a free for all.
  2. Don’t strip plants bare, leave fruit for others and for the wildlife.
  3. Make sure you know what you have collected before using it as food.
  4. Only collect from areas where you are happy there won’t be contamination, so right next to a busy road might not be great.
  5. Always be considerate and sensible about where and how you forage.

The are some good books on foraging to help you know what you might find where and when and also for identification. Three that I particularly like are Food for Free by Richard Mabey (it comes is a tiny pocket size so is easy to carry with you); The Foragers Handbook by Miles Irving more a research book for at home, Miles also runs foraging courses (as do others); and the River Cottage Hedgerow Handbook by John Wright.

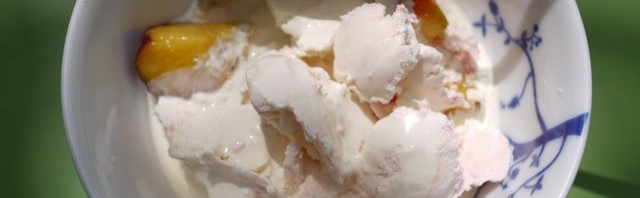
Most of what you’ll collect over the next two months will be fruits and berries of some description, but there could be end of season vegetables too from the garden. There’s mushrooms to be had of course but that’s a whole other topic. To decide what to do with whatever glut you have think about the following: how ripe is the fruit, how sweet or tart is it, how long is the season (is this the last for this year or might you be able to collect more), how much do you have? All of these things will influence what you might choose to do. If you have a small amount of ripe fruit then if its edible uncooked you’ll probably want to eat it as is with cream or yoghurt or perhaps made into a cake, pudding, tart or crumble. If you’ve a lot of something then you’ll need to preserve some for later use either as a jam, jelly, chutney, pickle or something. I tend to make pickles, chutneys and fruit vodkas because they are what I like but think of what is most likely to get eaten up before next years glut and also what people you know will appreciate as presents. If the fruit is less ripe then pickles and chutneys are a good choice as the sourness is part of the taste and can be balanced by the spices and sugar. Very under ripe fruit can be made into Indian style pickles (a bit like lime pickle), I’ve tried this with plums and green tomatoes and it works well with both.

There really are so many choices it’s hard to single out one recipe (but I’ve included lots of links this month for you). Good resources are River Cottage Preserves Handbook by Pam Corbin and The Jam, Preserves and Chutneys Handbook by Marguerite Patten. Both are excellent on basic techniques with plenty of recipes to try. Do remember that if you are making chutney or pickles then you need a non-reactive pan (i.e. not aluminium) and inevitably the vinegar evaporates so have the extractor on and close the kitchen door, the taste though, is worth it.

One thing I’m determined to try this year is drying fruit. I love the dried berries and apples in granola and muesli so I’m going to make my own. I’ll be following this method from a curious little book called They Can’t Ration These, written during WW2 by Vitcome de Maudit (and republished by Persephone) its fully of quirky ideas for foraging and cooking.

How to Dry Berries

Use only sound, unbruised fruit, wash, clean and drain the berries on wooden or iron sheets and place them in a very moderate oven (110F). Raise the heat gradually to 130F, then when the berries fail to stain the hand when pressed but are not so hard that they will rattle, take them out and store. The length of time for the drying varies with the kind of berries, but it is from 4 to 6 hours.

(Note: The temperatures quoted don’t seem to tally with any conversion charts I can find so I’m assuming that the oven should be on its lowest possible setting. This is part of the joy of old recipes.)

This article was first published as part of the series I write for Francoise Murat & Associates newsletter. If you want to get the article sooner then why not subscribe to the newsletter which also has features on gardening (including kitchen gardens) and interior design.

In season: blackberries

Last weekend the twitter wires were buzzing with foodies claiming to have found superbly ripe blackberries in and around London. Seemed a little early to me but people were twitpic-ing them and they looked good. I was still doubtful but thought I’d take a chance and see what I could find. 

oops i spilt some!
oops I spilt some!

We found loads and loads and loads and loads of bramble bushes and plenty of smallish under ripe blackberries. No big fat juicy ones as other claimed to have found. I was beginning to think perhaps they were all having me on and had been foraging at their local supermarket…..

I wasn’t prepared to give up – I had empty bags to fill so after a bit more searching we settled on a spot and started to pick the best we could find moving on bit by bit to take the ripest ones and leaves the others for another day. We eventually collected about 1.5lbs – not a lot but I think another week or so and there will be a much better haul. We only saw one other person collecting and the bushes didn’t look like someone else had got there first and baggged all the plumpest ones. We did see plenty of people soaking up the sun, having picnics and larking about on the boating lake but no one was interested in blackberries.

So then I needed to decide what to do with the fruits. I wasn’t sure they were sweetish but a bit small to make a dessert with and it was too warm for crumble. So I rinsed them let them dry off and popped them in the fridge whilst I spooled recipes round in my head. then at breakfast one day when I was enjoyed some of Ginger Gourmand’s Lemon Curd (bought from her UKFBA stall a couple of weeks back) it came to me:

BLACKBERRY CURD :)

Genius I thought – tart berries and sweet butteriness what a combination. So back to the recipe books to find a recipe – well could I find one, no I could not and I’ve got at least four books on making preserves……it was time to freeform a recipe. A bit of detailed reading and I decided I that adapting a recipe for gooseberry curd would probably work. Here’s what I did:

Goodshoeday’s Blackberry Curd – makes 4 small jars

700g tart blackberries – rinsed and picked over for bugs and leaves
80ml water

Put the blackberries in a pan and add the water, bring to a simmer and cook for 15 minutes until they form a puree. Rub through a  sieve (preferably nylon) so you get as much of the juice and fruit as you can but no pips. Measure the volume of juicy pipless puree you now have. I got 350ml.

For each 200ml of puree you need 1 large egg or 2 yolks, 150g of sugar (caster) and 40g of unsalted butter (plus maybe more see later).

So I used 70g of butter, 2 medium eggs, and 260g of sugar as the nearest sensible equivalents.

Put the puree sugar and butter in a heatproof bowl and warm it over a pan of hot water, stirring until it melts/dissolves. Beat the eggs thoroughly and then add them to the blackberry mix, keep stirring over the hot water until it all thickens and coats the back of a spoon like a good cheese sauce would i.e. still a bit runny as it will thicken as it cools. Mine seemed a bit runny do I added about another 10/15g of butter (I didn’t weigh it I just added small pieces until I got the desired effect).

Then pout into hot stertilsed jars trying to avoid getting it all down the jars and on the work surface like I did (new narrower jam funnel needed for me I think). Lids on jars and leave to cool before storing in the fridge.

Remember to lick the spoon thoroughly and barter hard with anyone who tries to blag a jar because it tastes really good.

Recipe based on Gooseberry Curd by Marguerite Patten in The Basic Basics Jams, Preserves and Chutneys Handbook

Very easy rhubarb ice cream


As the sun has been out quite a bit over the last few weeks my mind turned to ice cream making. I don’t make lots of desserts or do lots of baking – I enjoy it but we just don’t eat dessert that often so it kind of gets wasted (this is not some ‘health’ or ‘no sugar’ things its just I prefer munching on savoury stuff these days); but every now and then a sweet dish is just what’s needed.

There are some really good ice creams out there especially at farm shops – enough really to make you wonder if home made ice cream is worth it, but of course it is – it’s a great project thing and good for impressing guests (or just your other half).

I’ve been a fan of Alder Carr Farm’s Alder Tree ice creams for a good number of years and when I get the chance I indulge in a little pot, sometimes insisting on a stop off at their farm shop just to get my hands on one. My favourite flavours are; Gooseberry and elderflower, Raspberry, Stem ginger and rhubarb and Summer fruits – its so hard to pick. Anyhow, we went for a walk near Blythburgh the other day and I was hoping for an ice cream treat at the end, but we were later than expected due to a route diversion and so there was no hope of getting my mitts on any ice cream anywhere ?

Okay a big disappointment – but there are always ways to compensate and so I started planning some ice cream making. I’d picked up some rhubarb at the farm shop and hadn’t decided what to do with it so, with the cogs in my head whirring into action, I settled on either rhubarb and elderflower or rhubarb and pink ginger ice cream. I generously allowed my husband to pick between these two choices and he went for the ginger option.

This is so easy to make you won’t believe it! You’ll need:

rhubarb – a couple of sticks
4 tbsp pink ginger cordial (I used Thorncrofts)
100g of greek style yoghurt
100g of crème fraiche (basically half of the standard size tub)
an ice cream maker (much easier) or a strong plastic box and a freezer (slightly harder)

What to do?


1. cut the rhubarb up pretty small – about 5mm thickness max – you don’t want big stringy bits of rhubarb in your ice cream. Then simmer in about 2tbsp of water (no sugar) it until its soft and breaks up easily (10-15 mins should do it). Leave it to cool completely.
2. when its cool mix in the 4 tbsp of pink ginger cordial (undiluted); or of course elderflower cordial if that’s what you fancy. Check the taste and add a bit more if you like things extra sweet.
3. stir in the yoghurt and crème fraiche – it’ll be pretty sloppy
4. fire up the ice cream maker if you have one and pour in the mixture, allow to churn. It’ll take at least 30 minutes to get to a good frozen but soft scoop consistency. Eat.
5. if you don’t have an ice cream maker then first of all get on to your loved ones and drop hints that you’d quite like one – the ones where you freeze the bowl start at around £35, if you’ve got rich loved ones make noises for one that has its own freezing unit (£220+). Then once you’ve done that put the mix in the plastic box, put it in the freezer and take it out every now and then to stir it as this breaks up the ice crystals and mkes for a smoother consistenty, probably every 2 hours will do it. It’ll take about 8 hours if you can wait that long.  

Enjoy, and feel smug.


First rhubarb harvest

Today we harvested our first stalks of rhubarb this season. Coming in at six stalks it made a nice compact handful. We’ve got 3 rhubarb crowns and one seems to be slightly ahead of the others so all the stalks came off the one plant. 

Over the last few seasons we’ve had mixed cropping results – in the first few years after they were properly established we got a pretty good crop and then a couple of years ago they started to bolt very early in the season. We would get curious but quite attractive flowering rhubarb stems but very little worth harvesting and the flower stems are hollow so no good for the pot. It seems that letting them flower or bolt reduces the crop. This year we could see the same thing was going to happen again so after some searching in gardening books (most of which simply didn’t even seem to recognise the problem) we found some advice in a wonderful old book (The New Illustrated Gardening Encyclopaedia by Richard Suddell, from the 1940’s I believe, its full of lovely pen and ink illustrations) which said the flower buds should be removed as soon as they appear at ground level. So we’ve done that and it seems to have worked so far; I’m hoping for a better crop this year.

I really love rhubarb, its such a wonderful part of the British seasonal kitchen, it can be refreshing and light or warming with a tang depending on how its prepared. For this first batch I decided simple was best and just cooked the cut up stems briefly in a small amount of water with a little sugar added until they became soft but still held some shape. So now there is enough lightly cooked rhubarb to last me this week, for adding to breakfast muesli or making a quick desert with Greek yoghurt. I’m looking forward to its refreshing tang and starting to think of some different recipes to try when the next batch comes through. I might even decide to force one crown next winter to extend the season and make me feel revitalised by the onset of spring a little sooner.

Lemon curd

Last week I mentioned lemon curd in my Labour of love post and one comment poster asked for a good recipe.

I’ve tried a few versions in the past – some come out fairly runny, some very thick. They all taste good but the texture and richness varies quite widely depending on the amount of butter and also egg yolks (some recipes use whole eggs some use a mix and some use only yolks). So there’s quite a lot of choices in picking a recipe.

I’m going to give you two recipes here – one for a good staple curd – not too runny not too rich and one very rich one.

First the good staple which comes from Hilare Walden’s Sensational Preserves book (with various of my comments added). I’ve made it a number of times always with great success.

You’ll need:


4 lemons (organic unwaxed for preference – the unwaxed bit is important, you’re going to be using the zest of the lemon and if its been waxed you’re going to have to scrub vigorously in hot soapy water and rinse before you can use them – what a chore)
4oz (115g) of unsalted butter
10oz (300g) of caster sugar – I like Billingtons Organic Unrefined Caster Sugar
4 medium size eggs
A heatproof bowl – e.g. a Pyrex mixing bowl
A saucepan that the bowl fits on but not in 

Grate the lemon zest – being careful not to end up with too much of the white (and bitter) pith and then juice the lemons. Put zest and juice in the bowl. Add the butter cut into about 1cm dice and the sugar.


Put around an inch of boiling water in the pan and then balance the bowl over the pan (the bottom of the bowl mustn’t touch the water) – this is called a ‘double boiler’ in case you see that phrase mentioned elsewhere. Keep the water just at simmering point and stir the mixture in the bowl as it dissolves.

Beat the eggs lightly and then add them to the mixture (most recipes tell you to strain the egg mix but I don’t think this is really necessary). And keep on stirring. For as long as it takes for the curd to thicken which might be anything from 15 to almost 40 minutes (dependent mainly on the amount of lemon juice, I think). Make sure the curd doesn’t get too hot and keep on stirring especially as it gets thicker or you’ll end up with curdled curd – not a good result.

Pour into warm, clean dry jars – straight from the dishwasher is a good way to achieve this and seal with wax paper disks if you have them and a lid. Putting the lid on while its all still warm helps create a vacuum and so the contents last for longer.

Store somewhere cool and dark and in the fridge once opened. It’ll last 2-3 weeks once opened – well it will if it doesn’t all get eaten before then. Makes about 1 ½ lb (a normal jam jar fits roughly 1lb). 

The richer (and it really is much richer almost too rich except in small quantities) comes from Gary Rhodes’ Complete Rhodes around Britain. It uses essentially the same technique but the ingredients are heavily weighted to butter and egg yolks. In fact it’s the kind of recipe where you need to have thought through what you are going to be doing with all the egg whites you end up with (e.g. make meringues).

You need:


3 lemons, 8oz (225g) unsalted butter (I told you it was rich), 8oz (225g) caster sugar and 5 (yes that FIVE) egg yolks. Proceed as above but spread more thinly when applying to toast. 

I’d recommend you try the Walden recipe first and then the Gary Rhodes if you fancy a rich lemony blow out experience at a later date. And if you think all that stirring is too much then try an upmarket ready made lemon curd – I most recently had the Duchy Originals one – very tasty, almost good enough to tempt you to scoop it out and put in your own labelled jar to pass off as your own ?