Slow smoky BBQ brisket

Barbecue food has always created a bit of a debate in this house. I like it but Ian claims he’s not much a of a fan…I think this has more to do with the faff of lighting the barbecue than the food. Suffice to say the last time we used the barbecue was 2 years ago.

But everyone, just everyone, keeps going on about ‘proper’ barbecue and I’ve been watching too much Food Network recently and I decided we had to learn to barbecue. A recent visit form a good friend who likes to experiment with smoky barbecue flavours and my mind was made up.

Ready to go on the BBQ

In the freezer was a piece of rolled brisket from the supermarket cheaps counter (i.e. the marked down stuff where you get real bargains if you arrive at the right time – a method of shopping perfected by my twitter chum Lynne and which I have been trying to emulate).

Smokin’ away

So we had brisket. I googled and whoa tons of links for how to barbecue it especially lots of slightly mad You-Tube clips. They all seemed to be talking about digging pits and cooking long and slow for 20+ hours. This seemed little excessive for a 1kg piece of meat…then I realised they were cooking about half a steer!

After a bit more searching I decided there were 5 key steps:

– marinating the meat in vinegar and spices (4-5 hours minimum for a piece the size I had)

– covering with some form of secret spicy rub

– cooking long and slow at a relatively low temperature

– getting smokiness into the meat – this could be at the same time as the slow cook or separately

– serving with a sticky sweet sour spicy barbecue sauce

So this is what we did:

– mixed some of TZ the Urban Spiceman‘s Dirty Liars Club spice mix with 4 tablespoons of white wine vinegar. Rolled the meat in it, covered and left for 5 hours to marinate.

– when it was time to cooke heated the oven to Gas 3 (150C)

– mixed the marinade with more of TZ’s spice mix and some oil and rubbed all over the meat

– placed the meat in a snuggly fitting oven proof dish, added 1 glass of red wine, covered and cooked for 3 hours

– with about 45 minutes to go we got the barbecue ready, light the coals and letting them burn down to the right level, we added some beech wood chips (you soak them first so they produce smoke rather than burn)

– smoked the meat on the barbecue for 40 minutes with the lid on

– reduced down the leftover cooking juices in the pan from the over cooking adding some of TZ’s Wor Sisters Sauce and some sugar to get a thick sweet sour spicy sauce

– let the meat relax for 10 minutes, cut in thick slices and served simply with boiled potatoes and buttered cabbage and the sauce on the side

IT WAS AMAZING

Ready to slice

There was plenty left so we had some in homemade buns with slaw and potato salad later in the week and finally we stir fried the last bits with greens, fresh ginger and garlic  and served on rice noodles.

Leftovers made a tasty stir fry

So easy, so delicious. We are both now BBQ converts.


Warming stew: Lentejas

Its pouring with rain today in London making the autumn evening dark even sooner…whats needed is a warming stew.

I’ve made this one a few times but the first time I did was back in early 2010 when the lovely people at Orce Serrano Hams sent me some of their chorizo and morcilla to try. This dish adapted from the Moro cookbook seemed the perfect way to try them out.

It’s pretty easy and quite and of course you can use chorizo and black pudding sourced in the UK but the Orce morcilla was something truly special, well worth treating yourself or friend to.

My Lentejas (Lentil, chorizo and morcilla stew)

200g of whole chorizo sweet or spicy as you prefer, slice into 2cm chunks

200g of morcilla or black pudding from your favourite supplier, slice into 2cm chunks

1 large onion, chopped

oil

smokey paprika

chilli flakes

250g of green lentils

10 peppadew peppers, sliced (optional)

stock or water

Heat the oil and then add the sliced chorizo and fry over a medium heat to cook and low the spicy juices to flavour the oil. Push the chorizo to one side and add the onion and peppers if using, cook for 5-10 minutes over a low heat to soften. Add the lentils and then the spices. Pour over the stock and bring to the boil. Drop in the sliced morcilla and top up the liquid so everything is just covered. Simmer until the lentils are cooked  and the liquid absorbed (20-30 minutes).

Serve with steamed greens or cabbage and mash or sourdough bread.


Panang Gai (dry chicken curry)

At the end of March I went off to the depths of Suffolk to meet Veronica from Leaf House. She’d asked me to come and visit to talk about how I might be able to help her as she switched the focus of her business. She also promised to make me a curry for lunch. We had a great day chatting business stuff and I can report that the curry was A-Mazing.

So I made sure I got the recipe. I’ve made it twice so far and it really is simple and gorgeous. Don’t be put off by the long list of ingredients for the paste its worth it.

Panang Gai, dry chicken curry

This is the recipe as Veronica gave it to me, with my adaptations in brackets:

First you have to make the red curry paste but you can blitz this to make it easier (I did and it was super easy). And you will have heaps left over to either make this one again or just use it for a ‘normal’ red curry 9I did half the amount so had none leftover). If you blitz rather than pound the paste, its a good idea to do at least day before so flavours ‘meld’ together (I didn’t I wasn’t that organised).

Red Curry Paste

nb.. recipe is from an Australian book ‘Thai Cuisine’ by Mogens Bay Esbensen… 1 cup = 250mls and 1 tablespoon is 20ml

1 cup shallots (red onions) chopped
1 cup garlic, chopped
1 cup lemon grass, tender parts only, chopped (I didn’t have any)
2 tablespoons coriander root (I didn’t have any of this either)
2 tablespoons galangal/laos root… fresh or dried, chopped
2 teaspoons peppercorns
2 teaspoons coriander seeds, roasted
2 teaspoons cumin seeds, roasted
2 teaspoons lime or makrut zest, grated
1 teaspoon nutmeg, ground (I didn’t add this as am not much of a nutmeg fan)
1 teaspoon mace (I didn’t have any)
20 – 30 dried red chillies (I used chilli flakes about 2 teaspoons worth)
4 tablespoons shrimp paste (kapee) (didn’t have any of this either)
2 tablespoons salt

Grind all together really well. Store in large, well sealed jar in the fridge. Keeps well. (As you can see I didn’t have lots of the ingredients BUT it still made a lovely curry)

Panang Gai.. dry chicken curry

750g chicken breast (I used left over roast chicken as that what I had and it was a mix of breast and leg meat)
1 tablespoon fresh or tinned green peppercorns, crushed (didn’t have any)
50g plain flour (ooops forgot this)
100ml vegetable oil
50g red curry paste
250ml coconut cream (not milk)
25g sugar
40ml fish sauce
60g roasted peanuts, chopped
Basil leaves to garnish.

Remove skin from chicken and cut into bite sized pieces. Rub crushed green peppercorns into the chicken meat and then toss in flour (obviously I didn’t do this bit). Heat oil in wok and stir fry chicken pieces until well coloured and nearly cooked. Remove chicken to platter and set aside.

Add curry paste to wok and stir fry for 2 minutes. Stir in coconut cream, sugar, fish sauce and peanuts. Stir well for 5 minutes.
Toss in chicken and coat with the thick sauce. Turn out onto serving platter and garnish with basil leaves.

note: I cooked the curry paste and sauce first and cooked for longer to thicken it as I hadn’t used flour, probably for 10 minutes. Then I added the chicken and cooked for another 10 minutes. I added some bamboo shoots at the end because I had some.

I think the secret is in making the spice paste it seems to give a much better tasting result.

Making paneer

I LOVE cooking curry, its so much better when you make it yourself. And it also means you can use an ingredient I don’t think you see enough of in menus and that’s paneer.

Better still paneer is really easy to make yourself so you can feel super smug home-made curry AND home-made paneer.

Panner and whey

So last time I fancied curry I decided I’d do some paneer. I got a bargain carton of proper whole milk in the supermarket reductions and I was away.

Paneer (makes enough for 1 main dish curry for 2-4 depending on what else you serve)

2 pints whole milk
2 tbsp lemon juice

1. Heat the milk in a pan until it comes to a boil. stir it to prevent it burning.
2. Turn the heat right down and add the lemon juice stirring as you add it. Turn off the heat.
3. Continue to stir off the heat whilst the curds form.
4. When the curds have separated leave to stand for 10 minutes.
5. Carefully spoon the curds into a muslin lined colander or sieve. Fold the muslin over the top and weigh down with a plate a tin.
6. Leave to drain and firm overnight.
7. Unwrap and store in the fridge covered until needed. It will keep for two weeks.
If the curds don’t separate properly initially then add a little more lemon juice and reheat.

I used the whey in bread making, it gives a lovely loaf for toasting.

Soups and Stocks

Although spring definitely feels like it might be on the way some days are still pretty cold and so a warming soup is just what’s needed, here’s some thoughts on soup I wrote for Francoise Murat & Associates newsletter in January. I think I might just have soup for lunch tomorrow.

January is a funny month. For some people it feels slow and difficult, winter is most definitely with us, its cold and its dark, summer seems such a long way off whichever way you look at it. For others it’s a chance to think afresh of a new year with new challenges, making resolutions and feeling energised by the possibilities. But what has this got to do with soup? Well the versatility of soup and the range of recipes out there mean it can work for whichever way you see January. It can be warming and comforting or bright, lively and refreshing. Hearty or light, you can make it whichever way suits you best.

Roasted root vegetable soup with cheese

To make really good soup though you need some good stock. Water will work in many recipes but I’ve rarely made a soup that isn’t enhanced by using stock rather than water, there is an extra layer of flavour and complexity. People will compliment you on the simplest of soups if you’ve used stock. Making stock doesn’t have to be complicated; it can be as simple as simmering a few vegetables in water with or without a few herbs right up to making a consommé, essentially a beautiful clarified reduced stock. I usually make stocks with the carcass left over from a roast chicken or the bone from a rib of beef, or keep the liquid from cooking boiled ham and use that as a stock, I like doing this because each stock carries some of the flavours of the original meal and it makes best use of the meat you’ve bought. You can also get bones or chicken wings specifically and make a stock with those. Most recipe books will explain how to make a range of stocks but ‘A Celebration of Soup’ by Lindsey Bareham is particularly thorough, if you can track down a copy, with recipes for just about every type of stock you can imagine. Stock is perfect for freezing and then always to hand. If you don’t have a freezer then some good quality stock or bouillon cubes will give you a better result than plain water.

So you have your stock. Where might you head next? These are the things I think about when building a soup:

Thick or thin: Do I want a broth with interesting chunky additions or do I want something thick and velvety smooth in texture. Clearly you can pick somewhere between these two but I like to decide which direction I’m heading on this one before anything else.

Herbs or spices: I usually either head for something based round European flavours and herbs or something mainly based round spices whether Indian, Mexican, Middle or Far Eastern. Then I narrow down a bit to a more specific cuisine British, French, Italian, Spanish, Moroccan, Chinese, Thai, Indian and so on.

Then I take a look in the fridge and the cupboards and see what fits with the ideas I’ve got. Of course a little bit of tweaking happens at this stage when I find a critical part of my genius soup is sadly unavailable, but usually it is easy to stay fairly close to the original idea. If there is left over roast meat that might feature, sometimes there are roasted root vegetables that can be included, or beans of various types, pearl barley or lentils, tinned tomatoes or passata, chorizo or pancetta or salami, fresh ginger or chilli, mushrooms, potatoes (roast potatoes are lovely in soup), peas and so on …… but not all in the same soup. I rarely follow a recipe specifically but I do always take a look in a few books to help my ideas and also make sure I’m not making some horror of clashing ingredients. Sticking to a few key ingredients and combinations that you know work from your other cooking really helps and of course, so does making a soup to a particular recipe every now and then to expand your repertoire.

Here are guidelines to 3 quick soups I make quite often (all recipes for 2).
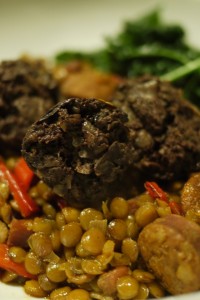
Beany Pork Soup

  • 500ml stock (preferably ham but chicken or vegetable also work)
  • 1 tins of beans (e.g. chickpea, haricots, butter, red kidney) including the liquid in the tin if its got no added salt
  • Pancetta, salami, chorizo, bacon, left over boiled ham or roast pork, whichever you have
  • Onion (chopped)
  • Oil (rapeseed or olive)
  • Herbs or spice to complement

Sauté the onion in some oil and when translucent add the meat that you are using and toss with the onions, allow to cook through if the meat is raw. Add the stock and the beans. Add your chosen spices and seasoning and simmer gently until it is properly heated through, about 20 minutes. Serve with bread. I sometimes add finely shredded cabbage, greens or spinach to this soup or if there are cold cooked potatoes a couple of those to make it thicker and heartier (mush them in with a fork) or leftover cooked pearl barley.

Roast Root Vegetable Soup

  • 500ml of stock
  • 500ml of roast vegetables (i.e. put them in jug to see how much you have), any mix you like. I particularly like it when there is beetroot as it makes the soup an amazing colour
  • Onion (chopped)
  • Oil (the same as you used to roast the vegetables)
  • Herbs or spices of your choice
  • Cheese to sprinkle on top

Sauté the onion in some oil and when translucent add the stock and the root vegetables. Add your chosen spices and seasoning and simmer gently until it is properly heated through, about 20 minutes. Either whizz in a blender, food processor or using a stick blender or mash with a potato masher. The texture can be anything from velvety smooth to quite chunky but it should all be well combined, this isn’t a broth with bits soup more a liquidy puree. Serve with cheese sprinkled on top and bread.

Spicy Soup

  • 500ml of stock
  • fresh ginger and chilli finely sliced
  • other spices of your choice
  • chicken or beef or prawns or vegetables, cut in small pieces (except prawns)
  • spring onions or garlic finely chopped
  • rapeseed oil

Have the stock already heated in a separate pan. Sauté the spring onions or garlic in the oil until softened. Add the ginger and chilli and sauté for a few minutes. Add any further spices and sauté briefly. Add the meat, vegetables or prawns and cook on a high heat like you would a stir-fry. Add the hot stock and bring to the boil. Serve immediately and add Asian seasoning such as soy sauce or nam pla if you wish. You can add noodles to the stock (cooking to the packet instructions).

Spicy sour green pickles

So the tomatoes should have been ripe ages ago but mine still look like this:

Which means I’ll be making batches of green pickles again this year. But that’s okay because I rather like the green pickles. I made them first with under ripe plums that I collected in deepest Suffolk with Vivia of Grethic’s Grethica. She also tracked down some recipes which she posted links to here. Its worth watching the you tube clips because they are a bit bonkers but to make it a bit easier I’ve given the recipe the way I did it here.

You need:

Lots of unripe tomatoes or plums

Sour pickle:

1 quantity (see note) each of fenugreek seeds, mustard seeds, red chilli flakes, cumin seeds, coriander seeds

½ quantity of salt

¼ quantity of tumeric

rapeseed oil

Sweet and sour pickle:

8% salt

4% tumeric

50% sugar

rapeseed oil

In both cases the quantities take a bit of guess work. In the second one I assumed it meant use 8% of the weight of fruit you have etc. In the first one it was harder so I just did what looked like a sensible quantity for the fruit I had the get a good level of spiciness.

This is what you do:

Cut the tomatoes (or plums) into quarters. Discard the stones if you have plums. I usually make one batch of each type so I split the total fruit in half then carry on.

Sour pickle:

Mix the spice and salt together in a bowl. Add the fruit and coat with the mix. Cover with cling film and leave somewhere light and warm for 3-4 days. Pack tightly in sterilised jars and cover with rapeseed oil. Leave it to mature for at least a month. This one is quite like lime pickle so is great with curries. I use any leftover spicy oil for cooking curry as well.

Sweet and sour pickle:

Mix the salt and tumeric together and add the fruit. Coat. Cover with clingfilm and leave in a bright warm place for 2-3 days. Add the sugar and leave for a further 3-5 days. Pack into sterilised jars and cover with oil. As this one is sweeter it also works well with cheeses or cold meats.

Here is what you end up with:

Fresh from the oven: Turkish Pide

I’ve been a bit remiss on contributing to the Fresh from the Oven challenges of late, I missed out on doing croissants and pizza, both things I really fancied trying. Well i did do the pizza but I forgot to blog in in time, oops!

So this month I got well ahead of myself and made the challenge almost week for the deadline instead of on the day!

The bread we baked was Turkish Pide and the challenge was hosted by Mrs Ergul.

I had a bit of fun with the US measurements getting muddled and almost using a whole stick of butter instead of half. But I got there in the end. The bread was really easy to make and very tasty. Mrs Ergul says the dough might be very wet but mine actually started off quite dry so I had to add more water to get it fairly sticky. I used my usual kneading technique of short gentle kneads spaced out through the rising.

To go with the bread I made some Turkish inspired kebabs (minced beef, chilli, cumin and coriander), some minty yoghurt and some tomato and onion salad. It was very yummy and I think they bread’s soft texture would be great with burgers. We used up the rest of the bread with dips the next day.

Here’s the method as given to us my Mrs Ergul (with some UK annotations by me):

Ingredients:

4 cups (to 5 cups) All Purpose Flour (ie plain flour, I only needed 4 cups and I used a cup measure as I have a set. 1 cup is approx 130g of flour)
1 and 3/4 cups Warm Water (1 cup = 236ml)
1/2 stick Butter ( melted ) (1 stick = 113g)
1/2 tablespoon Instant Yeast
1 tablespoon Sugar
1/2 tablespoon Salt

Topping:

Black and White Sesame Seeds (I used cumin seeds as I didn’t have sesame seeds)

In a large mixing bowl, mix all of the dry ingredients
Add melted Butter and Warm Water into this mixture and knead
The dough should be sticky
Cover the bowl with a plastic wrap and keep it in a warm place for rising
Let the dough rise to double its size
Knead the dough again until it is bubble free
Place a parchment paper on a 13″ by 10.5″ baking tray
Take the dough to the tray and make it flat with your hands until it cover all of the surface of the tray
Dampen your hands with Water if the dough stick to your hands on this step
Then take a knife and give the dough square shapes going deep down
Sprinkle some Sesame Seeds on top
Preheat the oven to 350F (R4/180C)
Let rise the dough for half an hour
Bake it for 30 minutes or until the color of pide turns light brown
Take the pide out of the oven and let it cool for 20 minutes and cover it with a clean kitchen towel to keep it soft