Asparagus Rolls

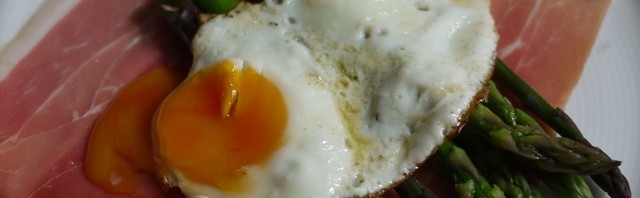
I love asparagus. Really love it. I could eat it everyday for the duration of its short season and not get bored. In fact I would probably have it nearly the same way each time, nice and simple with good butter or oil. I might steam it, roast it or chargrill but I’d still dress it simply. I might have it with some cured ham or hard tangy cheese. But in the main I’d let the asparagus do all the talking.

And once the season was over that would be it. No more asparagus for a whole year. Because even more so than other vegetables asparagus loses much of its taste if its transported any distance. Not for me asparagus flown in from Thailand or Peru or Chile, it just doesn’t taste good enough to justify its price or its carbon footprint. The perfect situation for me would be to grow some in the garden but we don’t really have the space to create raised beds and London clay doesn’t make asparagus happy. I might dare to try it in a large tub and see how I get on; even a few home grown spears would be a wonderful thing to have. Until then though I’ll buy at local farm shops and PYO to get the best flavour. And I’ll eat and eat it until the season is done.

The short season usually starts in late April (traditionally St George’s Day) and lasts through to mid June though of course this is dependent on the weather during winter and early spring. Anywhere with sandy soil is good for asparagus growing and each well-known area from Formby in the North West to East Anglia and the Vale of Evesham stake their claims for being the best. Of course the best asparagus is what you can find that has been picked very recently and arrived in your kitchen quickly and landed on your plate ready to eat with minimal fuss.

Asparagus has always been prized and ‘The Neat House Gardens’ relates how the early market gardens surrounding London vied to produce asparagus as early as Candlemas by use of hot-bedding techniques and the liberal application of horse manure sent out from the city with the forced vegetables being sent back for consumption by the rich. Up to at least Mrs Beeton’s time asparagus continued to be forced and available from January. But at some point forced asparagus seems to have disappeared so either it didn’t taste much good or the cost became prohibitive, by the time Jane Grigson is writing about it in the 1970s there is no mention of it.

Times have changed in terms of cooking as well. Modern books suggest it takes about 8-12 minutes to steam whereas in the 1800s Acton, Beeton et al were saying 20-25 minutes of boiling and Grigson says it can take anywhere between 20-40 minutes. Goodness knows how big the spears needing 40 minutes were! Maybe the varieties grown have changed and we certainly seem to prefer our vegetable with lots more crunch than in the past but still 40 minutes seems extreme unless the aim was to make puree. Also common was to serve asparagus on toast to soak up some of the water from the boiling, steaming of course gets rid of this problem. And naturally the Victorians’ had special asparagus tongs for serving, mind you I think they had special cutlery for serving just about everything you can think of.

Recipe wise asparagus is often paired with eggs: hollandaise, dipped in boiled eggs, in omelettes, with fried egg in tapas, in tarts and quiches. Salty cheeses and cured meats also make great partners. Then there is the classic soup (which I have to confess I’ve never tried). Oh and of course with salmon or crab or chicken or….well almost endless possibilities. Googling ‘asparagus recipes’ gives 3.3 million hits so there is no shortage of ideas out there. One site I do recommend though is Fiona Beckett’s http://www.matchingfoodandwine.com/ which will help you pick the right wine to enjoy with your treasured asparagus; focus on how you are serving it to help you make a good choice.

Because you can easily find so many ways to serve asparagus I thought I’d offer you something a little different. Flipping through various books I found a recipe from Hannah Glasse in 1747. Here it is (complete with archaic spelling and quirks):

Asparagus forced in French Role

Take three French Roles, take out all the Crumb, by first cutting a Piece of the Top-crust off; but be careful that the Crust fits again the same Place. Fry the Roles brown in fresh Butter, then take a Pint of Cream, the Yolk of six Eggs beat fine, a little Salt and Nutmeg, stir them well together over a slow Fire, till it begins to be thick. Have ready a hundred of small Grass boiled, then save Tops enough to stick the Roles with; the rest cut small and put into the Cream, fill the loaves with them. Before you fry the Roles, make Holes thick in the Top-crust to stick the Grass in; then lay on the Piece of Crust, and stick the Grass in, that it may look as if it was growing. It makes a pretty Side-dish at a second Course.

Inspired by this I did:

Asapargus and Egg Rolls:

Serves 1 for lunch

1 crusty French roll or half a small baguette

8 spears of asparagus

1 large or two small eggs

Mayonnaise (fresh or your favourite shop bought)

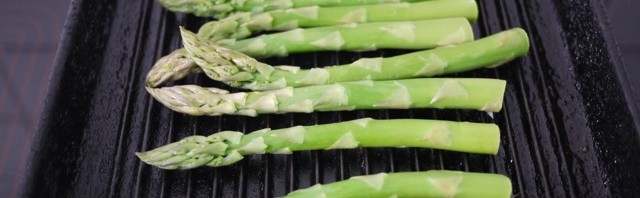
Cut the top off the roll, remove some of the crumb or else you will face the dangers of squirting egg mayonnaise everywhere. Hard boil the egg(s) and make into a light egg mayonnaise with as little mayonnaise as will just bind the eggs. Part steam or blanch the asparagus and then finish on a chargrill. Slather the egg mayonnaise on both sides of the bread. Put the asparagus on the bottom part of the roll. Put the top of the roll back on. Serve with salad. Watch out for escaping egg mayonnaise.

This article was first published in Francoise Murat & Associates newsletter in May 2010.

Easy Lunch: Asparagus

I’ve said on here before how much I love asparagus and I’m very certain I will be saying it again before the season is over. Earlier in the week I went really simple with steamed asparagus and slithers of Ticklemore cheese popped under the grill until the cheese was just melting. The salty goats cheese was great with the asparagus. I didn’t take pictures though because I was so busy eating it.

Today I went for Parma ham, steamed asparagus and fried guinea fowl eggs.

Oh yum.

I don’t think you need instructions to be able to copy this, of course feel free to substitute the egg of your choice.

This week I am mostly eating asparagus from Norfolk.

Eggs-eptionally seasonal

This article was first published in Francoise Murat & Associates newsletter in April 2010.

We’ve just had Easter eggs, egg-decorating competitions at school and the hens are laying well again. With year round supplies of eggs in the shops we forget they are seasonal. We forget that when we talk of eggs we mean hen’s eggs. Anyone who keeps a few hens knows that during the winter they hardly lay at all and it takes until spring for them to get back to producing an egg a day. Jane Grigson talks of eggs as a rarity in the winter months and preserving them in late summer in isinglass to last through the autumn. Others cite coating eggs in wax to preserve them. Modern hen breeds produce up to 250 eggs per year but that’s still 165 days when they don’t lay, earlier breeds produced as few as 50 eggs.

Its not just hens eggs that are seasonal, now is the time to track down something different. It’s relatively easy to find duck and quails eggs in farm shops and markets, goose eggs are a bit more difficult to come by. Other eggs are harder to find. You need a good local source and then you might be able to try bantam, guinea fowl (not until June), gulls or pheasant and even turkey eggs. Friends and neighbours with a surfeit of eggs from now through until summer will be happy to share. Be sure to offer something in return, bird feed isn’t cheap even if the grass they have foraged on is free.

With this in mind I decided to collect a selection of eggs and do a little comparative taste test. I was able to get bantam and different hens’ eggs from friends. Duck, goose and quail I spotted at the farm shop but when I went back to get them someone had come in and snapped up 6 lots of 24 quail eggs, and all the duck eggs, that’s a lot of eggs. I bought a goose egg and then found Clarence Court sell duck and quail eggs via Ocado so I bagged some from there. On the ever-fascinating Twitter, I saw Sarah of Brays Cottage having scrambled turkey eggs for breakfast (as part of her Norfolk Diet) and she kindly got some more from her neighbour and sent them by post.

With my collection of eggs ready I pondered how to cook them for the taste test. Both old and new books listed a huge number of recipes and ways of cooking eggs. Treatises on egg farming, the science of cooking eggs, and eggs in different cuisines diverted me. I was reminded that Grimod de la Reynière says ‘The egg is …such an indispensable necessity that the most skilful cook will renounce his art if he is forbidden to use them’. After all the searching I decided simple was best. I planned a grand breakfast of soft-boiled eggs, then recalling how full I was last time I had goose egg for breakfast I decided hard-boiled was better as I could sample a slice of each and then save the rest for later.

But how best to boil an egg? Something so simple the British public was offended when Delia Smith promised to teach us. A little background reading of Harold McGee and Hervé This on the science of cooking eggs made me realise that it wasn’t quite as simple as it seemed. Hervé This investigates how to cook the perfect hard-boiled egg to ensure that: the shell doesn’t crack, the shell peels easily, the white isn’t rubbery, the yolk isn’t sandy, the egg isn’t sulphury and the yolk is centred!

Hervé This’ Perfect Hard-Boiled Eggs – as interpreted by me:

  1. Take one or more egg
  2. Prick egg on the wide end with a pin to make a small hole, this prevents cracking.
  3. Place egg in water that’s is between 70-90C i.e. not boiling.
  4. Cook at below 90C for the usual time for the type of egg; this cooks with no rubberyness, no sandyness or sulphur smells.
  5. During the cooking keep rolling egg over in the water, this keeps the yolk centred.
  6. Lift egg from the water and place in cold water, this stops the cooking.
  7. Place egg in vinegar for several hours, the shell will dissolve. I find that eggs that are slightly older peel more easily.

And the taste test. The main differences are in yolk and white colour and ratio. The tastes were almost indistinguishable. Good fun to try the different eggs though.

In Season: Cheese and Onion

This article was first published in Francoise Murat & Associates newsletter in March 2010.

Mention cheese and onion and most people think of crisps. My quick Twitter survey revealed answers naming the Walkers brand, the colour of their bags (blue apparently) and even Gary Linekar, the face of Walkers crisps for so long he must surely have earned more from promoting crisps than from playing football and being a pundit. A few people were more inventive suggesting pasties and toasties but for most it was all about the crisps. The reason the crisp flavour works well is that the milky sour tang of cheese and the pungency of alliums are happy bedfellows, which means they have lots to offer in the kitchen, and spring is when plenty of both are at their best, real cheeses and real alliums, not Walkers crisps.

Thinking about the combination a whole host of dishes come to mind: leek and cheese sauce for pasta or chicken, onion soup with a lovely melting cheese crouton, cheese with pickled onions, cheese and onion marmalade sandwich, fresh goats cheese with chives, Yarg cheese wrapped in wild garlic, omelettes, frittatas or flans in a variety of allium and cheese combinations. The possibilities are endless.

British grown alliums are at their best now, lovely slim tender delicate leeks, new season spring onions, regular onions, shallots and of course wild garlic. Wild garlic has become an ‘on trend’ ingredient in the last couple of years as foraging has grown in popularity. It’s easy to find (the smell is a giveaway) particularly in woods by streams, you can grow it in your garden in a shady spot (but beware of it taking over) and you might see it at farmers’ markets or farm shops. You can eat the leaves and the flowers but like any allium it can range from mild to blow your head off in strength so always taste a little first before deciding how to use it. If you go foraging make sure you aren’t on private land or ask permission first, don’t collect from close to busy roads and be sure you know what it is you’ve picked. Don’t dig it up, leave enough for others to have some and for the plant to survive next year. The flowers are pretty sprinkled on salads and the leaves make a good substitute for leeks or spring onions.

As for cheese, fresh cheeses are particularly tasty in the spring as herds start to feed on grass again enriching the milk with clean herby flavours. Britain has a wealth of artisan cheeses and you should be able to find at least at one or two fresh cheeses in delis and farm shops. If you can’t then why not do a little experimenting in the kitchen and try making your own curd style cheese. It’s very simple to do and works with all types of fresh milk: cow’s, goat, sheep, even buffalo. Unpasteurised milk is lovely but normal works fine. This method is quick and easy and good as a supervised experiment for children. The yield varies depending on the milk, its highest with buffalo and lower with cow’s milk but whatever you choose you’ll get a lovely fresh delicious cheese. You can use the leftover whey in bread making in place of some of the milk or water.

Fresh cheese

Adapted from a recipe in the Casa Moro Cookbook by Sam & Sam Clark.

Ingredients:

  • 750ml milk
  • 1 tbsp essence of rennet (note that essence of rennet has already been diluted if you use undiluted rennet you must dilute it with water first)

Method:

  • Warm the milk to between 32-37C.
  • Add rennet and stir.
  • Pour into a bowl and cover with cling film.
  • Leave in a warm place for 30-45 minutes.
  • The curds will have set so cut them into about 3cm cubes whilst still in the bowl. Be gentle.
  • Leave for a further hour in a warm place.
  • Strain the curds into a muslin-lined colander.
  • Leave for about 6 hours for the whey to drain.

It’s as simple as that. The cheese will keep for up to a week in the fridge. It’s very mild in flavour and is particularly good rolled in some finely chopped wild garlic leaves or other fresh herbs. It also works well in omelettes, flans, and frittatas and stirred into pasta, with alliums of course and maybe a little mustard.

So next time you think of cheese and onion go beyond the immediate thought of a crisp flavour and branch out a bit in the kitchen.

Fresh from the Oven: Savoury Kringel

Its been a while since I’ve taken part in any of the Fresh from the Oven challenges; either I had the time but the recipe didn’t appeal (usually because it was sweet, I don’t really do sweet baking) or the recipe looked great and I was mad busy. When I first looked at this challenge from Jo’s Kitchen my heart sank to my boots, yet another sweet recipe I thought and rolled my eyes. Then I spotted tucked at the bottom that instead of sugary raisiny chocolately sweetness there was an option with cheese. Yes CHEESE one of my ALL TIME favourite foodstuffs.

The finished article

I still left making it to the last day though, now there’s a surprise! So this morning I was dashing about making sure I had the right ingredients. Naturally my instinct to not follow ANY recipe to the letter immediately sprang into action and instead of getting some cheddar at the shops (which they had) I was drawn in by some hard goats cheese from Lancashire and bought that instead. This may have something to do with the fact that cheddar, even really good cheddar, is not really that high up my list of favourites but Lancashire most definitely is.

So off I set to make the recipe. The original recipe does not give full instructions for the savoury version so this is my adaptation (note I did half of these quantities). You can see the original recipe here.

Savoury Kringel

Ingredients (Makes 1 large loaf)

  • Dough
  • 40g fresh yeast (I used 1 sachet fast action yeast for ½ the flour)
  • 1tbsp sugar
  • 250ml milk, lukewarm (I had to add about another 10ml to my 125ml as the dough was too dry)
  • 2 egg yolks
  • 50g butter, melted
  • 600-700g flour (I used 300g of strong white bread flour)
  • I didn’t add any salt as I know my cheese was very salty.
  • Filling and topping: 4oz grated hard strong cheese such as cheddar

Method

Mix the yeast and sugar in a bowl. Add the lukewarm milk and egg yolks, then mix in the flour and melted butter and knead well. Shape the dough into a ball, cover the bowl with a tea towel and leave to rise in a warm place for 30 minutes. (I did three fast Dan Lepard style kneads over a 1 hour rise)

Preheat oven to 200°C/Gas 6. Dust your work surface with flour (I used oil I never use flour). Take the dough out of the bowl, knock it back and roll out to a thickness of 1cm (mine was prob less than 1cm). Sprinkle about 2/3 of the grated cheese over the rolled out dough.

Roll up the dough like a swiss roll and cut it in half with a sharp knife (lengthways). Starting from the uncut end, plait the dough, lifting each half over the other in turn. Finally, shape the plaited bread into a B shape (mine was circular as I only had half the quantity) and transfer to a greased baking tray. Bake for about 25 minutes or until golden.

Once cooked turn off the oven, sprinkle the bread with the rest of the cheese and put it back in the cooling oven for 5-10 mins until the cheese melts. Allow to cool fully and serve.


Ready to eat

Was it good, yes. Will I make it again, I might. I think it would be good with soup (we had a chunk with salad). It looks rather attractive and it is easy to make so it would be a good loaf to make if you have guests. I’m not 100% sure I like savoury filling that much with an egg enriched dough as I find the taste and texture a little too cakey with the savouriness, but that’s just me.

Cooking with Tea

Last year one of the things I got up to when I went blogging AWOL was to attend the Tea Cookery workshop run by Pei of Teanamu. I’ve cooked with tea a little bit over the years using it to smoke duck, chicken, salmon and tomatoes (yes, tomatoes) and also to make a fruit cake that was one of my Grandma’s specialties where the dried fruits are soaked in tea overnight. All have always been delicious and the tea imparts a subtle yet rich flavour to both sweet and savoury dishes, so I was looking forward to learning more about using tea in cooking but not being much of a tea expert I didn’t realise the delights I was in for.

The location is lovely, Pei holds the workshops at his home and while Pei cooks, we watch and take notes, we eat delicious food over a leisurely two – three hours. Being invited into someone’s home to learn about food feels very special, more a meeting of friends than a food workshop. As Pei makes the dishes he explains about each one and we gather round the island worktop to watch and learn.

Pei uses a range of different teas to demonstrate the varying flavours and effects that tea can bring to cooking from the very delicate to the earthy. He stresses that the dishes he has created wouldn’t normally all be served at one meal as that would be considered an over emphasis on tea but there might be one course that contained tea in some form. Tasting the dishes I think that most people would be more than happy to eat a menu such as this and the different dishes with tea as a theme would create a talking point at a dinner, that is probably against all the ideas of balance that eastern philosophy has but in terms of taste to a western palate the dishes work in harmony.

Here’s the dishes we sampled:

Steamed Tofu in a Tuo Cha Konbu Broth

Tempura Vegetables with Shiso Sencha Green Tea Salt

Grilled Salmon with Lapsang Souchong Tea Rub with Matcha Noodles

Matcha Jelly and ding Dong Sorbet with Candied Azuki Beans

As you can see all the dishes were beautifully presented and all tasted amazing. Pei runs similar workshops (the recipes will vary with season) throughout the year. The food I ate and the teas we drank started me on an exploration of tea that is still progressing. I don’t think I had ever realised how different and how delicious tea can be.

With thanks to Pei for inviting me to attend the workshop as his guest.

A Lancashire Macaroni Cheese

I don’t particulary recall eating macaroni cheese as a child not from a Heinz tin, not lovingly made by mother or grandmother, its simply not a dish that springs to mind as something we ate often. I don’t know why. So when Fiona Beckett started the idea of the ultimate mac n’ cheese (as our friends in the US of A call it) I thought this would be an ideal opportunity to create my own version. Fiona’s competition started out simple and then got lots of categories (best this, best that, best other and so on) and I toyed with the artisanal cheese category for quite sometime knowing which cheese I would choose. And then Fiona announced the prizes and my mind was made up I had to have the Emma Bridgewater macaroni cheese dish come what may. So my entry is for the most original recipe.

Starting with my artisanal cheese idea and then spooling it out into the dish my mother or grandmother could have made I decide this had to be a dish based in the foods of Lancashire (well apart from the macaroni of course). I played with adding things like vimto or tizer, might they be secret umami giving ingredients, unlikely, so they were consigned to the ‘too original’ slot. Some researching in Laura Mason and Catherine Brown’s Traditional Foods of Britain (if you don’t have this book and you love British food just get it) led me to two possibilities: potted shrimps or bury black pudding. A tough one a really tough one. So I flipped a coin and it came down on the side of the black pudding.

Here’s what I did (its in old measures in honour of my Grandma):

A Lancashire Macaroni Cheese

Ingredients (for 2 hungry people):

1 bury black pudding (the sort in a hoop shape and of about 1” diameter)
3-4 oz dried macaroni each – depending on your greed
¾ pint full fat milk
1 oz flour
1 oz butter and some for frying
4 oz Sandhams Tasty Lancashire cheese*
2 oz Booths** Special Reserve Tasty Lancashire Cheese*, grated/crumbled
salt
pepper

pre heat oven to R4/180C

Method:

  1. Cook the macaroni in boiling lightly salted water as per the instructions on your packet (mine said 8 minutes). When cooked drain and keep on one side.
  2. Slices the black pudding into ½” rounds and fry quickly on either side in a small amount of butter. You are aiming for the outside to be crispy and the middle still soft. Removes the skin from the pudding and crumble the slices.
  3. Make a white sauce of a thickish consistency (between coating and panada) using the ‘all in one’ method. So put the flour, milk and butter in a pan and heat gently stirring continouosly until it thickens. Add the 4oz of Sandhams Tasty Lancashire cheese and season to taste.
  4. Find a shallow dish, butter it (dream of it being this Emma Bridgewater dish).
  5. Toss the crumbled black pudding in with the cooked macaroni, stir in the cheese sauce. Tip it all in the buttered dish.
  6. Sprinkle with the 2oz of Booths Special Reserve Tasty Lancashire.
  7. Bake in the oven for 30 minutes.
  8. Eat and dream of Lancashire.

* If you don’t know that there’s more than 1 version of real Lancashire cheese then watch out for my tasting of seven types coming soon. I’ve picked these two examples because like all Lancashire they melt beautifully and because they differ in strength, the Sandhams is slighty milder (but still with a good tang) the Booths** has a strong tasty Lancs hit.

** Booths is a small supermarket chain based in the North West of England. If all supermarkets were like Booths it would be a good thing.