You might remember that I used to write a monthly blog for Francoise Murat Design about season British food. Well, Francoise has had the blog redesigned and its now called Rendez-vous Deco & Jardin, it looks lovely and I’m please to say I’m back doing my monthly feature.
My first piece was on how versatile brassicas are in the kitchen are and how useful they can be in in the lean vegetable months before the UK growing season gets into swing.
You can read the article here, its packed with ideas on how to use brassicas from spicy to mild, british to asian cooking, there is sure to be something to suit you.
It’s pretty much the hottest day of the year and I’m about to eat a full Christmas dinner in deepest Berkshire. Just what is going on. Especially as I’m not turkey’s number one fan. It’s okay but to date its not had a guaranteed place on my christmas table….
When I was a kid we always had roast turkey for Christmas dinner and it was good, but it never seemed as nice as the excitement it generated amongst everyone else. For me it was never quite a tasty and juicy as roast chicken. Maybe the plethora of trimmings overshadowed it …. what with tons of chipolatas wrapped in bacon, my mum’s top notch roast potatoes and my gran’s secret chestnut stuffing I’m not sure the turkey had much of a part to play. At least not for me.
So once I got to be in charge of cooking christmas dinner I varied what was on offer. If we were having turkey cooked for us elsewhere close to Christmas. I’d cook something else. If we were hosting the main event I’d stick with turkey (and still secretly wish it could be chicken we were having), if there was just the two of us well then I had free rein beef, duck, goose,chicken, pork, ham all possibly except lamb eaten over the years.
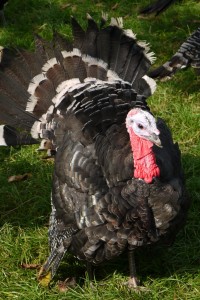
So is this turkey different? Well for a start I know a lot about where its from and how its been reared. On the basis that an animal that has lead a happy life is supposed to taste better then this has all the hallmarks of being winning. It’s also been cooked by Brenda Copas and is about to be carved by her husband ‘Old Tom’. What the Copas family don’t know about rearing, cooking and carving turkey probably isn’t worth knowing. They’ve been rearing turkeys since 1957 and still use traditional methods and breeds. All the turkeys are grown to maturity and the different breeds provide the size variation rather than many producers some of whose turkeys are slaughtered younger to provide smaller birds. Copas say that for traditional breeds its the way the turkeys are reared rather than the breed that creates the flavour.
We’ve visited the farm and met the turkeys (curiously inquisitive animals whose odd looks belie a docile nature). We’ve heard about what makes the turkeys special:
– grown to full maturity
– only raised during the traditional breading season and not year long
– raised outdoors in orchards, grass fields with maize banks for foraging
– access to shelter at all times and spend overnight in big roomy barns
– slaughtered with the highest possible welfare standards and low stress environment
– dry plucked by hand
– game hung for 10-14 days
– hand prepared and packed
Tom carves, plates are handed round and after a toast we tuck in. Its good, very good. Lots of flavour, moist, tender. The breast meat is excellent with a good balance of delicateness and proper flavour to satisfy everyone the legs are gamier and much more remisent of other birds. Some of each is a good contrast. Several people have seconds (this is getting rather like real Christmas) some of us are pretty full so save a little space for dessert.
So will I be switching to turkey every Christmas??
Wisely sheltering from the sun
That’s a really difficult one, now I know what excellent turkey tastes like and how to cook it…well its definitely much higher up my list but I’m a contrary thing and I’d probably still vary from year to year depending on who I’m cooking for. One things for sure I’d be seeking out a Copas turkey and if I was too slow and missed out (after all they do only rear about 50000 turkeys each year) then I’d be looking for something that was reared in a similar way from a farmer with high standards.
Copas Turkeys have a Great Taste Awards Two Gold Stars (2010) and having been a judge for the 2011 awards I know how high the standard is to achieve that .
Order your Copas turkey online or through one of the butchers who stock them. Be quick they sell out fast.
Its pouring with rain today in London making the autumn evening dark even sooner…whats needed is a warming stew.
I’ve made this one a few times but the first time I did was back in early 2010 when the lovely people at Orce Serrano Hams sent me some of their chorizo and morcilla to try. This dish adapted from the Moro cookbook seemed the perfect way to try them out.
It’s pretty easy and quite and of course you can use chorizo and black pudding sourced in the UK but the Orce morcilla was something truly special, well worth treating yourself or friend to.
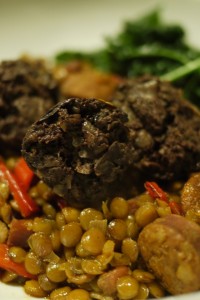
My Lentejas (Lentil, chorizo and morcilla stew)
200g of whole chorizo sweet or spicy as you prefer, slice into 2cm chunks
200g of morcilla or black pudding from your favourite supplier, slice into 2cm chunks
1 large onion, chopped
oil
smokey paprika
chilli flakes
250g of green lentils
10 peppadew peppers, sliced (optional)
stock or water
Heat the oil and then add the sliced chorizo and fry over a medium heat to cook and low the spicy juices to flavour the oil. Push the chorizo to one side and add the onion and peppers if using, cook for 5-10 minutes over a low heat to soften. Add the lentils and then the spices. Pour over the stock and bring to the boil. Drop in the sliced morcilla and top up the liquid so everything is just covered. Simmer until the lentils are cooked and the liquid absorbed (20-30 minutes).
Serve with steamed greens or cabbage and mash or sourdough bread.
Last weekend I was casting around for what to do with some lamb breast and neck I had defrosted and the weather seemed to good for hearty stews. I asked the hive mind that is twitter and carried on flipping though cook books for inspiration. At roughly the same time as I was eyeing up a porchetta recipes Chris from La Hogue Farm shop suggested a herby stuffing and wrapping the breast round the neck.
And so I set out to make lamb-chetta.
I didn’t want too dense a stuffing so I decided to simply use lots of fresh herbs.
Rosemary, fresh bay leaves and lemon thyme from the garden
I laid out the meat and added some ground black pepper and the herbs
Lamb breast with herbs ready to roll with neck fillet
I rolled it up and tied with string
Rolled and tied lamb with extra herbs tucked under string
I’m not expecting any awards for my butchers joint tie-ing skills…
It went into the oven for 4 hours on gas mark 3 (150-160C). I’d loosely covered the tray with foil and part way through cooking I added a few splashes of white wine as well.
Fours hours in low oven temp....
We carved it into quite thick slices and I’d say there was enough for four people
lamb-chetta slices
We had it simply with some potatoes and cauliflower
It was totally delicious soft super sweet meat from the slow cooking and layers of fat the two cuts contain, the herbs gave is a fresh edge.
We had some left which last night we used in a barley and lamb risotto, again delicious. i also tried a few bits cold and think it would make a great sandwich or simple salad with a slice on top of some lentils.
And as these two cuts are very cheap it was nice and frugal too.
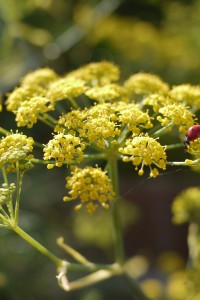
We’ve a huge fennel plant growing in our garden….we didn’t plant it I think it self seeded from next door. Anyway we kind of ignored it but now its time to tidy the garden so I decided to harvest the seeds before we up rooted it and find a few uses for them.
A bit of googling told me that they aren’t really seeds they are teeny fruits, and that instead of taking nice photos of ladybirds clambering over the yellow flowers earlier in the year I should have been harvesting the pollen as this is the most sought after part. I didn’t but I’ll know for next year.
I’m only part way through collected all the ‘seeds’ and I have tons so I’ve been searching for ideas of how to use them so far I’ve got the following to try:
– beany sausage casserole with some fennel added to the cooking sauce
– fennel shortbread
– fennel (and possibly pear) ice cream or sorbet
– toasted fennel seeds to snack on
– sprinkled on salads especially ones involving cheese
– torta aciete
– crackers for with cheese (I tried these yesterday see recipe at the end)
– scandi style vodka (of course)
– simple fresh cheese with fennel
And I’ve yet to properly explore the section on anise in The Flavour Thesaurus. Still I think it’s going to take rather a long time to use them all so I’ve promised some to Scandilicious (as she loves them an they are big in Scandi cooking) and some to Northcore Brewery so thye can play with how they work in beer.
All further suggestions for how to use them welcome. Many thanks to the following tweeters for the list so far:
I found this recipe for seedy crackers by Hugh FW on the Guardian. I thought it looked good so naturally I read it and erm then fiddled with it. This is what I did:
125g strong white flour
1/4 tsp salt
1/4 tsp baking powder
1/2 tsp fennel seeds
20ml EV rapeseed oil
water
I mixed all the dry ingredients together, I added the oil and stirred it in. I added water a tablespoon at a time until I got a softish dough. I reckon it took 60ml water. I kneaded it gently. I rolled it out in one big piece direct onto some non-stick foil and cut about half way through in strips to make rectangular biscuits. Into a pre heated oven at R3.5 (oven runs low) and baked for the supposed 5 minutes, and another and another…and in total it took 25 mins and I still don’t think it was quite cooked. But it tasted good especially with some salty pecorino or robust cheddar. I probably didn’t roll it thin enough and I guess 1 large piece takes longer to cook than lots of neat biscuits.
Verdict: good, no way the cooking time is 5 mins (perhaps in a giant bakery deck oven?!) definitely one to try again and play with flours maybe spelt or some oatmeal next time.
At the end of March I went off to the depths of Suffolk to meet Veronica from Leaf House. She’d asked me to come and visit to talk about how I might be able to help her as she switched the focus of her business. She also promised to make me a curry for lunch. We had a great day chatting business stuff and I can report that the curry was A-Mazing.
So I made sure I got the recipe. I’ve made it twice so far and it really is simple and gorgeous. Don’t be put off by the long list of ingredients for the paste its worth it.
This is the recipe as Veronica gave it to me, with my adaptations in brackets:
First you have to make the red curry paste but you can blitz this to make it easier (I did and it was super easy). And you will have heaps left over to either make this one again or just use it for a ‘normal’ red curry 9I did half the amount so had none leftover). If you blitz rather than pound the paste, its a good idea to do at least day before so flavours ‘meld’ together (I didn’t I wasn’t that organised).
Red Curry Paste
nb.. recipe is from an Australian book ‘Thai Cuisine’ by Mogens Bay Esbensen… 1 cup = 250mls and 1 tablespoon is 20ml
1 cup shallots (red onions) chopped
1 cup garlic, chopped
1 cup lemon grass, tender parts only, chopped (I didn’t have any)
2 tablespoons coriander root (I didn’t have any of this either)
2 tablespoons galangal/laos root… fresh or dried, chopped
2 teaspoons peppercorns
2 teaspoons coriander seeds, roasted
2 teaspoons cumin seeds, roasted
2 teaspoons lime or makrut zest, grated
1 teaspoon nutmeg, ground (I didn’t add this as am not much of a nutmeg fan)
1 teaspoon mace (I didn’t have any)
20 – 30 dried red chillies (I used chilli flakes about 2 teaspoons worth)
4 tablespoons shrimp paste (kapee) (didn’t have any of this either)
2 tablespoons salt
Grind all together really well. Store in large, well sealed jar in the fridge. Keeps well. (As you can see I didn’t have lots of the ingredients BUT it still made a lovely curry)
Panang Gai.. dry chicken curry
750g chicken breast (I used left over roast chicken as that what I had and it was a mix of breast and leg meat)
1 tablespoon fresh or tinned green peppercorns, crushed (didn’t have any)
50g plain flour (ooops forgot this)
100ml vegetable oil
50g red curry paste
250ml coconut cream (not milk)
25g sugar
40ml fish sauce
60g roasted peanuts, chopped
Basil leaves to garnish.
Remove skin from chicken and cut into bite sized pieces. Rub crushed green peppercorns into the chicken meat and then toss in flour (obviously I didn’t do this bit). Heat oil in wok and stir fry chicken pieces until well coloured and nearly cooked. Remove chicken to platter and set aside.
Add curry paste to wok and stir fry for 2 minutes. Stir in coconut cream, sugar, fish sauce and peanuts. Stir well for 5 minutes.
Toss in chicken and coat with the thick sauce. Turn out onto serving platter and garnish with basil leaves.
note: I cooked the curry paste and sauce first and cooked for longer to thicken it as I hadn’t used flour, probably for 10 minutes. Then I added the chicken and cooked for another 10 minutes. I added some bamboo shoots at the end because I had some.
I think the secret is in making the spice paste it seems to give a much better tasting result.
I LOVE cooking curry, its so much better when you make it yourself. And it also means you can use an ingredient I don’t think you see enough of in menus and that’s paneer.
Better still paneer is really easy to make yourself so you can feel super smug home-made curry AND home-made paneer.
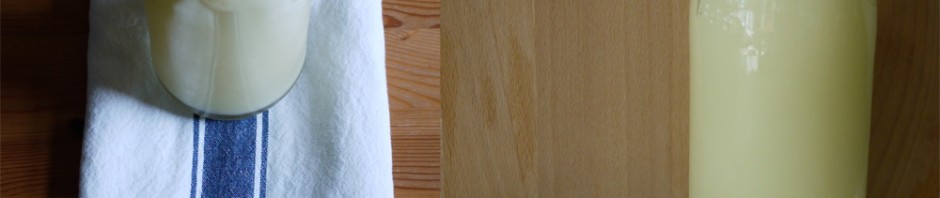
Panner and whey
So last time I fancied curry I decided I’d do some paneer. I got a bargain carton of proper whole milk in the supermarket reductions and I was away.
Paneer (makes enough for 1 main dish curry for 2-4 depending on what else you serve)
2 pints whole milk
2 tbsp lemon juice
1. Heat the milk in a pan until it comes to a boil. stir it to prevent it burning.
2. Turn the heat right down and add the lemon juice stirring as you add it. Turn off the heat.
3. Continue to stir off the heat whilst the curds form.
4. When the curds have separated leave to stand for 10 minutes.
5. Carefully spoon the curds into a muslin lined colander or sieve. Fold the muslin over the top and weigh down with a plate a tin.
6. Leave to drain and firm overnight.
7. Unwrap and store in the fridge covered until needed. It will keep for two weeks.
If the curds don’t separate properly initially then add a little more lemon juice and reheat.
I used the whey in bread making, it gives a lovely loaf for toasting.