Fresh from the oven: white tin loaf

I know I’ve been gone a while but hey now I’m back! First post after 5 weeks is this Fresh From the Oven Challenge that I hosted. I am going to do a post about going AWOL  so watch out for that coming up in the next few days, but here to whet you appetite for upcoming posts is some delicious bread I can highly recommend.

IMGP2646
Here's one I made earlier

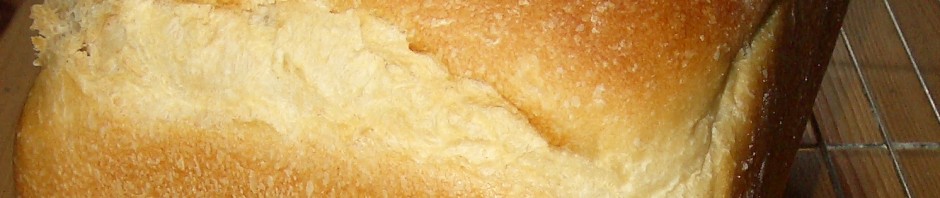
Although I’ve made this loaf a lot of the past few months either white or a 50:50 white-wholemeal mix I still thought I’d do one especially for the challenge. Unfortunately the day I was baking it I was in the the final stages of web project and wasn’t really concentrating properly. It was also quite a cool day so the 2nd rise seemed to be taking for ever so I put it in the oven regardless (it was no where near the top of the tin!) . I got okay oven spring but in the first 10 minutes of cooking I lost track of time as the client called to sign off the website ready for go live and to say how pleased they were. Result a rather dense chewy loaf, with a very crusty crust and a borderline burnt top. Still tasted better than anything you get in most bakers….

Less than perfect but still very tasty

Here’s what I said to the Fresh from the Oven group when I set the challenge:

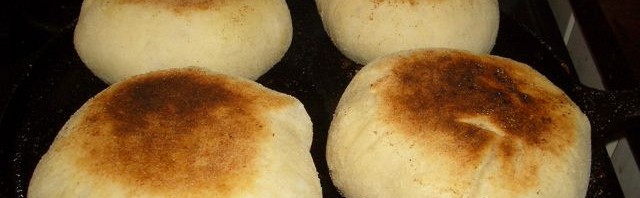
I’ve done lots of um-ing and ah-ing about what to pick for the challenge, I wanted something where I could show you the kneading technique I learnt from the Dan Lepard course I went on, something that seemed specifically English and something not so time consuming that you all decided not to participate. Crumpets and pikelets were out on the basis they don’t require kneading, sourdough on the basis that you might not all have starter so that would be a week of building one. Stotties were almost in but the recipe I found had potato in and that’s not how I remember them. Staffordshire oatcakes popped up but they don’t have to be kneaded either and so on and so forth.

At last I decided to keep it simple but still English. There is lots of talk of how bad English bread is (and it is when its made on an industrial scale using the Chorleywood process) but then everyone decides to ignore all thought of English bread and fall into the arms of French and Italian and other baking heritages. I love all these other breads but I also love a good old fashioned properly made tin loaf that is soft but slightly chewy, has a nice medium crust, that toasts brilliantly and makes a mean sandwich. The secret of course is in using milk for part of the liquid this gives a softness that’s just right without making the loaf a full on slightly sweet milk loaf (although when I found this on the Lakeland site I did nearly decide to do milk loaf).

If you don’t fancy doing a tin loaf then perhaps you can take part by using the kneading technique for your favourite loaf because it seems to work for everything from sourdough to rolls to pizza base and more.

First the technique:

Dan Lepard says he developed this when he was working full time in commercial kitchens (that made artisan hand kneaded bread) because there wasn’t time for full 10 minute knead of all the different bread batches so he switched to short kneads spaced out and found it works just as well, part of the development of a good gluten structure is dependent on the time elapsed not the vigorous kneading. I liked the idea because I’d not been getting good textures with either a machine or a normal hand knead. I am now a wholesale convert.

Note:

You must use oil not flour on the kneading surface and your hands. Something like vegetable oil is good.

The dough must be quite sticky and soft to start with. It will firm up when kneaded and as time progresses.

Steps:

  • Once you have soft sticky dough leave it covered in the bowl for 10 minutes.
  • Now oil your kneading surface and hands and tip the dough out.
  • Knead for about 12 seconds by folding in the edges to the centre, a bit like shaping a round loaf, rotate the dough as you go.
  • Flip the dough over, leave it on the surface and cover with a cloth. Wash out the bowl and then oil it lightly. Put the dough back in the bowl and cover.
  • Leave for 10-15 minutes and then do another 12 second knead. You will notice the dough is already less sticky and firmer.
  • Leave for 20 -30 mins and repeat the fast knead. You are aiming to have kneaded the dough 3 times in the first hour.
  • Leave covered to rise until at least 50% larger but not more than double in size (kneading once per hour if it takes more than hour to increase in size).
  • Tip out onto the oil surface and press the air out of the dough using the tips of your fingers so its square-ish in shape. Repeat the fast knead process (or fold in to thirds then rotate through 90, flatten again and fold into 3rds again).
  • Shape the dough as required for the particular loaf you are making. Put it in a tin, or supported in a floured cloth in a bowl.
  • Leave to rise until at least 50% larger and preferably almost double in size.
  • Slash top and bake as per your recipe.

White Tin Loaf (based on Dan Lepard’s Quick White Loaf, p63 of the Handmade Loaf)

2lb loaf tin greased and floured or lined with baking parchment (no need to line the short ends just oil them).

Oven to be pre-heated to its maximum setting (R10/250C) and with a tray of water in the bottom to create steam.

Ingredients:

200g semi skimmed milk at room temp (Dan uses whole milk but semi skimmed seems to work fine)

150g water at room temp (remember 1g = 1ml but its easier to be accurate weighing fluids)

1 tsp fast action yeast (or 2 tsp fresh yeast crumbled)

200g plain white flour

300g strong white bread flour

1 ½ tsp fine sea salt

Method:

Mix the flours and salt together in a bowl.

Mix the water and milk together in a separate bowl and whisk in the yeast.

Add the liquid to the flour and mix with the fingers of one hand to a soft sticky rough dough. You may need to add a little more liquid do this a teaspoon at a time until you have a soft sticky dough.

Follow the kneading instructions above.

The first rise will probably take about an hour from the last knead.

To shape for a tin loaf, flatten the dough to a square about the same width as your tin. Roll the dough into a cylinder and press the seam firmly, fold under the two short ends and place in the tin seam side down.

Allow to rise (covered) to 1 ½ to 2 times volume i.e. to the top of the tin.

Slash the top of the loaf along it length and put it straight into the oven for 10 minutes at maximum temperature. After 10 minutes check how it’s browning and drop the temperature as follows (these baking guidelines are from the River Cottage Bread Book):

R6/200C if the crust is pale

R4/180C if crust is noticeably browning

R3/170C if crust is browning quickly

And cook for a further 40-50 minutes.

I usually check again part way through this time and either adjust temperature again or cover the top with foil if it’s brown enough. Also note that with a traditional gas oven (i.e. one without a fan) the top may brown far too quickly on the side near the heat at the initial temperature so you might want to start at a lower setting of R8/9 for the first 10 minutes. Adapt the setting for what you know about your oven and how things usually bake.

When it’s cooked turn it out of the tin and allow to cool.

Then when it’s cooled cut a big huge doorstop of a slice, toast it and slather with lashing of butter. Yum.

The recipe also works well with a mix of 50:50 wholemeal and white bread flours. You’ll probably need 2-3 tbps extra water.

Fresh from the oven – buns, curry buns

Last month I schlepped in right at the last minute with my Fresh from the oven challenge, this month I did better – hey I was there a whole week before the deadline baking away. How organised and complaint of me. Erm, well, maybe. Those who know me well know that doing what I’m told when I’m told is something I have mastered the art of mostly avoiding. So this month instead of taking the deadline to the wire I thought I’d ignore some of the very specific instructions and freeform the recipe a bit even though it wasn’t something I’d ever tried before. Did this lead me on a route to disaster  – lets see……

I was pleased when I saw that Ria (of Ria’s Collections) had picked what she calls stuffed buns, because I quick glance though the recipe suggested that these were going to be like the legendary curry buns I ate at a hill station in Malaysia with my husband on our very first holiday together. Wow. We have often reminisced about these little buns, which were wonderfully soft and had a lovely curry filling. We’d never tasted anything like them before and since I’m talking quite a few years back when only the (un)lucky few had email and the internetsuperhighwaythingy was in its very early infancy we never tracked down a recipe. They became a kind of mythical dish. Could Ria’s recipe live up to all this?? We both had very high hopes.

Curry buns right out of the oven

The recipe basically seems to be one for a kind of brioche type dough made with milk, a fair bit of sugar and also egg. Ria is very clear that it MUST be kneaded for 10 minutes to achieve the right consistency. The filling is a mild chicken curry, Ria suggests paneer can be used for vegetarians. And this is when I start to freeform. I happen to have some lamb curry leftover so I decided I’m going to use that as a filling – can’t go far wrong surely. The dough just sounds too rich – I quite like brioche but since this is a joint memory we are trying to live up to here and Ian doesn’t like sweet dough’s I cut back on the sugar a bit and swap the egg for the same volume of milk. Then I just go for it and ignore the 10 minute knead instruction as well. I blame Dan Lepard for this entirely. He doesn’t do a long knead and since learning his method in mid June I’ve become a bit of a convert…you make a rough dough, leave it for about 10 minutes, come back, 10 seconds of folding, repeat this rest and knead 3 times in the first hour and then once per hour during the first rise. It’s worked well on every loaf so far I can’t see why it won’t work here. The theory is that it’s not so much the vigorous kneading but the elapsed time that creates a good network of bubbles.

The dough is quite soft and a little sticky but not too difficult to work with as it has oil in it which makes it pliable. It rises quite quickly but it is a fairly warm day. After the first rise you divide it up and shape it into rounds put some curry mix in the middle and then shape rather like a round bread roll. It has a 20 minute rise like that and then it’s in the oven. You have to be careful because the richness of the dough means it browns very quickly – they are cooked in 10 minutes.


mmmm look at that delicious

So were they any good? Absolutely yes. They had a good soft texture and certainly lived up to our memory from Malaysia. Even with my changes the dough was still rather rich and sweet for our liking so when I try them again I’ll cut back on that further. It was a good way to use up some leftover curry and I don’t think they suffered from all my meddling – of course I might be wrong, the real deal might be even more delicious, but I’m more than happy to have found a way to recreate a happy food memory.

Thanks Ria for the recipe and I’m not sorry I meddled with it :0

Recipe for dough (I used the cup measures in Ria’s original):

1 tsp dry yeast (I used fast action yeast)
2 tbsp warm water
1/2 cup milk
salt to taste
1/2 cup oil (I used rapeseed)
2 cups all purpose flour (I used strong bread flour)
1/4 cup sugar (I sued about 1/3 cup and the dough was still too sweet I thought)
1 egg beaten (I used another couple of tablespoons of milk)
egg white and sesame seeds to decorate if you wish (I didn’t)

  •  dissolve yeast in warm water with 1/2 tbsp of the sugar and 1/2 tbsp of flour. Leave for 10 minutes.
  • Boil the milk and allow to cool (gosh I didn’t do this either). Once cool add sugar oil and salt and mix until the sugar dissolves.
  • Add 1 cup of flour and mix to a smooth paste.
  • Add the egg and also the yeast mix then the rest of the flour and mix to form a soft dough.
  • Knead using your preferred technique.
  • Rest and when its doubled in volume shape into flat rounds, fill and shape into buns by folding the the sides of the rounds to the centre. Decorate with egg and seeds if you wish.
  • Leave to rise for 20 minutes covered with a cloth then bake at 200C for 10 minutes. I actually did them at R6/180C and they took 10 minutes. Be careful they brown very quickly.

Fresh from the oven: English muffins

This is my first ‘Fresh from the oven’ bread baking challenge. I missed out on the first two because, well because, I was just too slow off the mark signing up. Anyway I’ve joined up now and I’m hoping its going to a be a fun way to do some different breads and also chat with other food bloggers and improve my breadmaking.

As soon as I’d signed up and logged on I took a look at the challenge and thought ‘hmmmm interesting, not tried that before, best do some reading round the matter’. This is a technique I term displacement activity i.e. read up on things rather than getting on with doing them, instead why not mull them over, learn something new, contemplate different angles, ponder, maybe be buy a new and, of course, necessary piece of kit to aid the process.

English muffins
Cooking on the griddle

And then….

I was sitting around on Wednesday thinking:

‘um must be time to do another loaf of bread what shall I try?’, and

‘hmmmm haven’t written a blog post for ages AND haven’t blogged any of my bread exploits’

when suddenly I thought:

‘*******! I’ve got to have posted my Fresh from the oven challenge on Friday and I haven’t even done it yet’.

Big whoops – talk about in a world of my own.

Anyway very fortunately for me, Claire over at Purely Food, who set this months challenge, had picked English muffins and a quick squint at the recipe revealed that it didn’t require any exotic ingredients – in fact I had everything I needed right there in the cupboards. So I was sorted for a day of bread making yesterday. There’s nothing like taking a project to the deadline I always say…..

The recipe Claire had given us was from the River Cottage Handbook (#3 Bread) (see it here) but we are free to use other recipes or adapt as we see fit, all in the spirit of experimentation and sharing tips and techniques. I decided I’d stick pretty much with the recipe but halve the quantities as it said it made 9 muffins and that seemed rather too many for two people one of whom remains to be convinced that muffins are worth the fuss (lets hope these homemade ones are a hit). I also adapted the kneading technique to the one I learned from a 1 day Dan Lepard masterclass I attended back in June.

Here’s my thoughts on the recipe and how things went:

  • halving 325g makes it difficult to weigh out on lovely old-fashioned balance scales – I think I really do need electronic scales
  • I always weigh the water – weird but more accurate; remember from at school 1ml = 1g
  • I should have used 5g of yeast but the sachet was 7g so I put the lot in
  • I used extra virgin rapeseed oil instead of sunflower – because that’s what was to hand
  • the dough wasn’t as sticky as I expected initially so I added another splash more water – kind of undermines my accuracy of weighing the first bit as I don’t know how much a splash is
  • I used the Dan Lepard kneading technique – i.e. several short kneads spaced out
  • it was a warm-ish day so the dough seemed to rise quite fast, it only took about an hour to double in size
  • halving 9 gets 4.5 you can’t make 4.5 muffins I chose to make 4 instead
  • I cooked it on an oiled flat cast iron griddle
  • the muffins came out pretty giant
  • it’s hard to tell how brown or otherwise they should be on the outside as there’s only a picture of one split and toasted – I think mine are probably too brown

All that remains is to test them at breakfast in a bacon and egg McMuffin style. I shall report back.

UPDATE 30/08/2009:

The McMuffin style breakfast worked really well. We toasted the muffins lightly then buttered them, added 2 rashers of bacon (unsmoked), dolloped on some ketchup and topped with a fried egg (easy -overed) then popped the top of the muffin on and munched away. I was so busy eating I forgot to take a picture (ddoh). They tasted really good although we didn’t wrap them in greaseproof as Mathilde had suggested (see her McMuffin brunch post here),Ii might do that for extra fun if I had guests staying.

Overall I’ve been really pleased with the muffins and I’ll do them again, its nice to try something different. The texture came out nice and even and they stayed good for 3 days – don’t know if they would last longer if I’d made the bigger batch. Curiously the semolina flour on the outside makes them taste slightly salty even though they aren’t. They made a tasty change from soft rolls and they were scored 7/10.

The remaining two muffins have also been eaten at breakfast; yesterday with blackberry curd:

english muffins
muffins with blackberry curd

and today with sausages. Look:

english muffins, sausages
muffin with sausage and ketchup